
Baroduino - Barograph with Arduino and 2,2" TFT screen [150425]
Searching the net I did not come across mainy projects resulting in a barograph where the 48 h evolution of the atmospheric pressure was displayed on a screen. Being a sailor it is important to monitor this evolution to an extend that a more than 140 Pa/h pressure drop is the indication of upcoming very strong winds.
Searching the net I did not come across mainy projects resulting in a barograph where the 48 h evolution of the atmospheric pressure was displayed on a screen. Being a sailor it is important to monitor this evolution to an extend that a more than 140 Pa/h pressure drop is the indication of upcoming very strong winds.
This project has been published in the September 2016 edition of Elektor Magazine.
Given this I decided to make a barograph showing the pressure evolution over 48h as well as a visual (flashing LED) and a sonic ( buzzer) alarm if the atmospheric pressure drops more than 140Pa/h.
In order to be very flexible with the power source I added a stable 5V power supply based on the LM2574 so that every DC power source between 5V and 40V is accepted. This is optional since if only used on a boat with 12V one could directly feed the Arduino RAW pin. My boat is 24 V and at home I plug in a 9V supply. A more compact alternative would be the Adafruit step down module LM2596S at 3,95€.
The total hardware apart from the power supply consists of 3 major components. The Arduino pro mini 5V, the Sparkfun sensor BMP180 breakout board and the Adafruit 2,2" TFT screen with SD card holder.
A micro SD card of 2GB is enough. This is necessary since all measurement are written to the SD card and they are read from this card to perform calculations or display historic evolutions. On top you need a piezo buzzer , a switch to shut off the alarm and a red LED with resistance but of course only if you want to incorporate the alarm functionality.
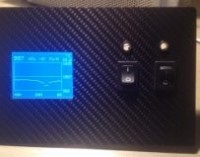
The sensor BMP180 also measures the temperature which I also display on the screen although not so relevant since depending on where the barograph is installed. I join a picture of the finished project as well as how to connect the different components.
Of course the sketch to load in the Arduino is also available.
Discussie (10 opmerking(en))