
Arduino on board
Arduino on Board
Arduino on Board
So the man at the Lab asked me for a prototype of my project because his men could not create the prototype at their lab. It could be due to some programming errors or some code errors which we tried to sort out over telephone but finally the result was negative and now he asks for the prototype.
But after burning 2 Arduino nano board due to my inadvertent experiment I'm left with only one Arduino Mega board and for sending him prototype of my “4 Chanel Servo controller for RC aircraft”, I need two Arduino boards – one for the transmitter and one for the receiver. An Arduino UNO board costs Rs:1400 ($21.5) in our country. Though there are china based supplier who delivers at the cost of $11 a piece but it takes more than 40 days to reach my quarter here in Vindhyanagar . It means if I try to save money then I will miss the publication in the coming month but do I really care for that ?
'Please give me some time to get it ready ', I blindly asked for some break though I don't know how to make him satisfied.
If only I can take out the microprocessor chip out of the UNO boards after programming and then put the project one a piece of Vero board ! Or if I could create an Arduino on a piece of vero board …... !
Meanwhile I kept exploring the Internet. Some people could be able to program raw microprocessor using Arduino UNO as in-system programmer but success with bigger microprocessor like ATMEGA chip is hardly proven consistently. The arduino.cc has got a chat boards where people could program Attiny 44, 85, 84 using Arduino as programmer.
The process involves two steps – first transfer the Arduino boot loader onto the raw factory cut chip which requires nearly 512 bytes of space and once that is done then you are only left with upload of the Arduino sketch onto the remaining space of the chip to do the bull works as described in the sketch. The ATMEGA328P has 32 Kbyte of flash memory for the whole work to carry out and it's a damn good amount of memory.
For this matter this is worth to mention that suppose you have an Arduino board which is built on ATMEGA328P or ATMEGA8A-PU like chip and due to some reason the chip has gone bad ! ( like my case). You buy another chip from market which comes for Rupees : 140 ($2.3 ) , take out the old chip and insert the new one and then start uploading some impressive sketch from archievemag.com .
Wow ! Nothing happens and the board behaves like a dead rock. This is right ! Because you have inserted a raw chip which does not have an Arduino boot loader preloaded. So the board does not know what is to be done with the chip and where to upload the sketch. Therefore, you should have bought an Arduino boot loader preloaded chip in the first place.
There are many variety of AVR programmer available in the market but most of them work with hex files or assembly level programming languages which I just hate to work with.
The fascinating thing is to use Arduino as AVR programmer and then upload Arduino sketch on to the chip using Arduino as the programmer. After trying and tweaking many nights here's what I got finally and this is just wonderful !
It's true to say that Internet has everything , only one needs to do some searching and tweaking to get the desired result !
I can now program ATMEGA328P, ATMEGA328 , Attiny 13A, 44, 45, ATMEGA8A-PU, ATMEGA8L-PU etc chips using my Arduino UNO board as programmer. Once the program is uploaded I take out the chip, put it on a piece of Vero board, put a 7805 voltage regulator , connect the devices like temperature sensor, 433 MHz radios, LCD character panel etc. thus recreate my project much smaller in size on vero board and then ship it to the lab as my project prototype. It's damn cheap now !
The softwares: All are located here ..
[avr_isp.ino : This file has been developed over the years by a number of contributors, The development started sometime in 2008, then a number of modifications made until 2012,
once uploaded this will make the MEGA board a programmer.
avrdude.conf: is the file already there in your arduino IDE installation directory
boards.txt : is also there in your arduino IDE installation directory, however in this boards.txt I've added a few additional microprocessors]
avr_isp.ino:
avrdude.conf:
boards.txt:
[all these files included in the attachments]
Arduino IDE: Version 1.0 is the most stable version that I use on my Ubuntu laptop. It's assumed that you too have one of the stable Arduino IDEs installed & working perfectly on your laptop.
Make your Arduino the ATMEGA programmer: This works for Arduino MEGA 2560 & Arduino UNO . So first connect the board , start the IDE and upload the avr_isp.ino file from the above location onto your UNO or MEGA board. Once this is uploaded your UNO or MEGA board is now ready for acting as a ATMEGA programmer.
Parts required: ATMEGA processor (boot pre loaded or not), 4 , 8 or 16 MHZ quartz crystal, 22 pf (2 nos), 1uf 10 volt electrolyte capacitor, an LED and a push to on switch (for the reset button )
Figure-1:
[Those are two of my Arduino UNO R3 board - programmed using another UNO board]
Connections: The quartz crystal of 4 MHZ / 8 MHZ / 16MHZ can be used but it's optional. The quartz is to be connected to pin no 9 and 10 and the 22 pf capacitor each connected between the quartz and the ground. If no quartz is used no need to use the 22pf capacitors. Once a chip is programmed with a quartz it won't be programmed without quartz again.
Figure-3
[Connections : Courtesy Jose Martin , 2012 ,Internet]
Process: ATMEGA328 chip has an onboard 8mhz internal oscillator. That means in absence of a quartz the chip can still be programmed and work at 8MHz speed. But unfortunately this is not visible in the boards section unless the boards.txt file is changed to make so. Replace the /usr/share/arduino/hardware/arduino/boards.txt file by the new boards.txt file that you have downloaded now. If case you have a different location please find out the boards.txt file and then replace it by this new file.
Close the Arduino IDE if it is already open and then restart the Arduino IDE. Now go to tools – board and look at the top 3rd and you would find the - ATmega328 on a breadboard (8 MHz internal clock) . The top one is - Rotceh-hack QM7298 w/ ATmega48V xD . All other boards are visible below these lines.
Now it's time to look at the chip that you have purchased. If it's ATMEGA328P , look at the 'P' sign then it can be programmed very easily because it has a common signature which has been taken care in the Arduino IDE. Just make the connection as shown and then select the board as ATmega328 on a breadboard (8 MHz internal clock) or Arduino UNO if you connect the 16 MHZ quartz and then put the 1uf 10 volt capacitor between the reset pin and ground pin of the Arduino MEGA board (now call it the programmer board, as it's now really going to do that job..). The capacitor actually prevents the programmer board from self resetting while uploading.
Go to Tools – Board - ( select your board )
Go to Tools – Burn Boot loader
…. and the magic starts …....
Now the lights on the programmer board will start blinking, if you have put the LED on the pin no 19 of the target board , it too will start blinking and after some time everything will stop. Be rest assured that the boot loader has been burnt on the new ATMEGA328P chip now. It's ready for getting programmed !
But the reality is always different, you have hardly got the right chip. In all probability the chip that you have purchased is ATMEGA328 , without a 'P' and that makes all the difference. The programmer window will say that the chip signature is different.
But don't worry it's always difficulty which has made us more wise in the fields of hobby electronics.
Go to the /usr/share/arduino/hardware/tools/ and replace the avrdude.conf file with the new avrdude.conf file that you have just downloaded. Keep a back up of the old file as it will be required again while programming the original chips. However, in your case if the avrdude.conf file is located at different location please go there and do so now. In fact we are just making fool of the IDE software now. Telling it to program the same ATMEGA328P (original ) chip with only a different 'signature' line.
[However, manually you can open the avrdude.conf file and then search for the block starting with 'ATMEGA328P' under it find the signature line and replace it with the new signature like this ]
# signature = 0x1e 0x95 0x0F; #bypassed by Bera
signature = 0x1e 0x95 0x14; #modified by Bera for atmega328
# is for bypassing the line from execution.
Avrdude.conf is very big file and First time when I did it , I did it at a wrong location under the similar ATMEGA description and signature line and the result was a prolonged frustration for me. Therefore, I recommend you just replace the file by the new file and it will work for all version of the IDEs.
Now close the IDE if it was open and then reopen the Arduino IDE now and try to repeat the previous process of burning the boot loader. It should work now as it has worked for me and there is no other signature available for the ATMEGA328 chip unless you invent one ! Remember the 1uf capacitor will always be connected on the programmer board else it will give errors.
For the latest Arduino 1.5.8 Ide the avrdude.conf file is located at
../arduino-1.5.8/hardware/tools/avr/etc/avrdude.conf
../arduino-1.5.8/hardware/arduino/avr/boards.txt
What next ? : All the fun is awaiting next. Now find the blink program from the example and then upload it on the target chip.
Go to File – Upload using Programmer [Remember this is not a common upload program, you are to upload it using the Arduino as a programmer ]
All the LEDs on the programmer and the LED connected on pin no 19 will start blinking for some time and then everything will stop. The LED connected to pin no 19 is the LED connected to digital pin-13 which will start blinking now to show that you have successfully burnt the Chip with the new blink program !
void setup() {
pinMode(13, OUTPUT); // The LED connected to pin no 19
}
void loop() {
digitalWrite(13, HIGH); // set the LED on pin no 19
delay(1000); // wait for a second
digitalWrite(13, LOW); // set the LED off on pin no 19
delay(1000); // wait for a second
}
Once this is done you can transplant the chip to a new vero board , connect a 5 volt regulator, 7805 , a reset pin with ground to pin no 1 , connector pins and you are ready with a new Arduino board. The 16 mhz quartz is optional but once a chip is programmed with a 16mhz chip you cannot reprogram it back to 8mhz internal oscillator.
[Later I tried with Uno or Nano board and it works flawlessly !!!]
Figure-2
[Here's an LCD panel connected ]
The board works with all the sensors, LCD panels, 433 MHZ Tx. & Rx, rotary encoders, joy sticks , servos therefore, it can be assumed that it's a normal board and will work like other Arduino boards. [Now sending a prototype is so easy for me. Even I can gift them too !!! ]
figure-4
[Pin up diagram of ATMEGA328 , also valid for 328P / 8A / 8L / ATMEGA168]
[photo courtesy:www.instructables.com ]
figure-5
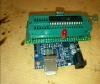
[Schematic for Arduino UNO as programmer]
S. Bera
Vindhyanagar
Build This Project
Bring this design to life with the Elektor PCB Service, powered by Eurocircuits. Upload the project files and order professionally manufactured PCBs or assembled boards through a proven European production platform.
Supporting KiCad, Eagle, Gerber, and ODB++ formats, the service is suitable for everything from prototypes and validation builds to series production and volume manufacturing.
Made in Europe. Fast. Reliable. Professional.
Discussie (0 opmerking(en))