
Embedded Chip-8 video game system [130469-I]
[updated 2014/06/23] Updated documentation (also included EEPROM tutorial in it).[updated 2014/05/16] Added tutorial to insert a game in the EEPROM (EEPROM tutorial.zip).[updated 2014/05/12] Cleaned up the code and added comments.Added game selection menu.
[updated 2014/06/23] Updated documentation (also included EEPROM tutorial in it).
[updated 2014/05/16] Added tutorial to insert a game in the EEPROM (EEPROM tutorial.zip).
[updated 2014/05/12] Cleaned up the code and added comments.
Added game selection menu.
Added game flasher source (to flash games on the EEPROM).
Fixed some bugs and added error screen.
[updated 2014/04/14] All games are now full screen !
+ added external EEPROM system (press right right button at start-up to load a game from the external EEPROM).
Will try to add a small menu at start-up as soon as possible !
[updated 2014/03/13] Fixed bug in source code (buttons on the right side were not correctly read by the PSoC).
[updated 2014/02/08] updated references of the project.
[updated 2014/01/25] added the datasheets of the PSoC (29466, Cypress) and the screen (TG12864B-02WWBV, Vatronix). A video is also available on request by e-mail (cf documentation.zip).
[updated 2013/11/08] added a 30-page pdf file explaining fully how it works ! (documentation.zip).
Chip-8 is a virtual architecture that was developped in the 70's in order to make video games development easier (http://en.wikipedia.org/wiki/CHIP-8).
It is roughly a virtual machine that can be easily implemented on any embedded system with a microcontroller, a screen and a few buttons. This means you could implement it on a smartphone, a washing machine, a printer ... and turn it into a game console.
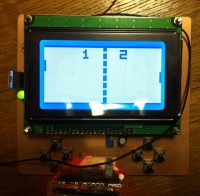
I implemented it on a PSoC 29466 with a standard LCD screen, a few buttons, an EEPROM memory and a buzzer. The hardware is not complicated at all and therefore is perfect for students or software engineers who want to learn about electronics. The software part is a little bit more tricky but brings a thorough knowledge of computer's architecture's basics as the main purpose is to simulate one.
I'll try to explain how it works as much as I can, please read it if you want to :
- turn an embedded system you own into a game console.
- get started with virtual machines' emulation.
Feedback is greatly appreciated !
----------------------------------
Beginning of the PDF file (documentation.zip) :
What is Chip-8 ?
Chip-8 is a virtual platform that was created in order to make it possible to develop video games without having to worry about hardware related issues. The idea behind Chip-8 is the same as behind Java or any virtual machine : all Chip-8 games are written for the same virtual platform, that is emulated by software on a real platform. In other words, the exact same game code can be executed on a smartphone, a computer, or even a fridge or a washing machine, as long as their firmware can emulate a simple virtual machine - the only requirements are a microcontroller, a screen and a few buttons. There are dozens of Chip-8 video games for free on the Internet. By programming a virtual machine, it is easy to turn any embedded system into a fun video game system.
How does it work ?
The Chip-8's virtual core is very similar to an actual microcontroller : it has a microprocessor with its registers and its stack, a memory space and two timers. It can execute 35 16-bit opcodes, and the games are programmed exclusively with those opcodes. The inputs of the system are buttons and the outputs are a screen and a buzzer.
To run a Chip-8 game on an embedded system, we therefore need to write a program (called an interpreter), in the native language of the embedded system, that will translate the 35 virtual opcodes into actual lines of code that will perform the same operation. For example, the opcode “00E0” is supposed to clear the screen. It is only one line on the game code, but on an actual embedded system it will require more lines to interact with the real screen, and will of course depend on the hardware.
Concretely, the interpreter uses the actual memory of the embedded system to store the value of the virtual registers, the virtual stack and the virtual memory, as well as other variables such as the program counter or the stack pointer. The game code is stored in an array of bytes. The interpreter then proceeds to read that array and to translate each opcode into equivalent functions. In C language, this is done easily by using a switch/case structure that dispatches the opcodes, typically :
The work to do is therefore to write the 35 functions that will execute the opcodes on the real hardware. Some are really easy to implement (e.g. ADD, SUB, …) while others can be more tricky (especially the opcode that draw on the screen or the opcode that generates a random number).
Content
Part 1 of this document explains the content of the Chip-8 virtual architecture, i.e. what needs to be emulated in order to be able to run video games. Part 2 shows the schematics that I used to build an embedded system dedicated to run Chip-8 video games, but of course any other embedded system that have buttons and a screen large enough should be able to run games as well. Part 3 explains how I configured the embedded system I built (timers, inputs, etc.). Part 4 explains how to program a Chip-8 interpreter, with the details of very opcode.
There are many ways to implement a Chip-8 interpreter. If you are interested in implementing one on an embedded system already exisiting, this project should have the solution for most of the problems you may run into (which are insufficient memory and insufficient inputs).
Summary
1 Technical specifications
2 Schematics
3 Hardware configuration
3.1 Buttons
3.2 Screen
3.3 Timers
3.3.1 Delay Timer
3.3.2 Sound Timer
4 The Interpreter
4.1 Memory allocation
4.2 Simulation of the Chip-8 cycles
4.3 Implementing the opcodes
4.3.1 Arithmetic opcodes
4.3.2 Branching opcodes
4.3.3 Memory opcodes
4.3.4 Timers opcodes
4.3.5 Buttons opcodes
4.3.6 Random number opcode
4.3.7 Graphical opcodes
4.4 Superchip opcodes
5 Playing games
6 References
Discussie (4 opmerking(en))