
Power supply for Raspberry Pi + hard disk [160494]
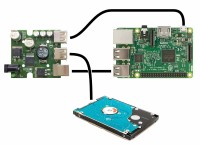
A single circuit to power a Raspberry Pi equipped with a hard disk.
Today the cloud is a popular solution to save and share files as well as allow access to your files from any computer anywhere in the world. Because of reliability and security issues of cloud storage, some people want to create their own personal cloud.
A cloud is made partly of hardware and partly of software. On the hardware side, I chose the Raspberry Pi platform equipped with a hard disk to be able to store a large number of files. Because hard disks consume a lot of power, I decided to design a power supply capable of correctly powering the Raspberry Pi – hard disk assembly.
For the software part, I chose the solution ‘ownCloud’. Offered as an alternative to services like DropBox, ownCloud is a free software to create file storage and distribution service platforms.
The circuit diagram of the power supply is based on an LM22678 switching regulator. It is capable of supplying a current of 5 A maximum. The more hungry SATA hard disks can consume up to 2 A at 5 V. If you consider that the Raspberry Pi nano‑computer consumes a maximum of 1 A at 5 V, our regulator has definitely got what it takes.
To power our system, the idea is to use an old ‘brick’ laptop computer power supply. These blocks generally deliver a voltage of around 19 V and can supply around 5 A, which makes them perfect for our application. Our regulator can support input voltages up to 42 V, so this is ideal.
To be compatible with the maximum number of laptop power supply blocks, our power supply card is equipped with a 2.1-mm DC connector socket (barrel jack). For some blocks, it may be necessary to cut off the original plug and fit a male 2.1-mm DC connector. But always check that you choose a laptop supply capable of supplying a current of 5 A.
Diode D1 protects the supply against wrong polarity of the input voltage.
Regulator IC1 exists in two versions of output voltage: adjustable or fixed at 5 V. I used the adjustable version, because that’s what I had on hand :-). The output voltage is set by the ratio of the values of the resistors R2 and R3.
Vout=1.285 × (R2/R3 + 1)
With R2 = 2.87 kΩ and R1 = 1 kΩ, the value of Vout is 4.97 V. If a fixed 5-V regulator is used, don’t fit R3 and make R2 = 0 Ω (or a link).
The two large electrolytic capacitors at the input serve to provide the extra current needed by the SATA hard disk at startup.
Resistors, all 0805, 0.1 W
R1,R3 = 1kΩ 1%
R2 = 2.87kΩ 1%
Capacitors
C1,C2 = 220µF, 50V, SMD, 10mm diam.
C3,C4,C5 = 22µF, 35V, SMD, 5mm diam.
C6,C7 = 100nF, 0805
C8 = 10nF, 0805
Inductor
L1 = 33µH, 3.4A, 70mΩ, e,g. Würth 74457133
Semiconductors
D1,D2 = VS-6TQ045SPBF
IC1 = LM22678TJ
LED1 = green, 3mm
Miscellaneous
K1 = DC barrel socket, 5A, 2.1mm diam.
K2,K3 = USB connector type A
K4 = USB connector type B
Hammond case 1593KBK
PCB Elektor 160494-1
A cloud is made partly of hardware and partly of software. On the hardware side, I chose the Raspberry Pi platform equipped with a hard disk to be able to store a large number of files. Because hard disks consume a lot of power, I decided to design a power supply capable of correctly powering the Raspberry Pi – hard disk assembly.
For the software part, I chose the solution ‘ownCloud’. Offered as an alternative to services like DropBox, ownCloud is a free software to create file storage and distribution service platforms.
The circuit diagram of the power supply is based on an LM22678 switching regulator. It is capable of supplying a current of 5 A maximum. The more hungry SATA hard disks can consume up to 2 A at 5 V. If you consider that the Raspberry Pi nano‑computer consumes a maximum of 1 A at 5 V, our regulator has definitely got what it takes.
To power our system, the idea is to use an old ‘brick’ laptop computer power supply. These blocks generally deliver a voltage of around 19 V and can supply around 5 A, which makes them perfect for our application. Our regulator can support input voltages up to 42 V, so this is ideal.
To be compatible with the maximum number of laptop power supply blocks, our power supply card is equipped with a 2.1-mm DC connector socket (barrel jack). For some blocks, it may be necessary to cut off the original plug and fit a male 2.1-mm DC connector. But always check that you choose a laptop supply capable of supplying a current of 5 A.
Diode D1 protects the supply against wrong polarity of the input voltage.
Regulator IC1 exists in two versions of output voltage: adjustable or fixed at 5 V. I used the adjustable version, because that’s what I had on hand :-). The output voltage is set by the ratio of the values of the resistors R2 and R3.
Vout=1.285 × (R2/R3 + 1)
With R2 = 2.87 kΩ and R1 = 1 kΩ, the value of Vout is 4.97 V. If a fixed 5-V regulator is used, don’t fit R3 and make R2 = 0 Ω (or a link).
The two large electrolytic capacitors at the input serve to provide the extra current needed by the SATA hard disk at startup.
Component List
Resistors, all 0805, 0.1 W
R1,R3 = 1kΩ 1%
R2 = 2.87kΩ 1%
Capacitors
C1,C2 = 220µF, 50V, SMD, 10mm diam.
C3,C4,C5 = 22µF, 35V, SMD, 5mm diam.
C6,C7 = 100nF, 0805
C8 = 10nF, 0805
Inductor
L1 = 33µH, 3.4A, 70mΩ, e,g. Würth 74457133
Semiconductors
D1,D2 = VS-6TQ045SPBF
IC1 = LM22678TJ
LED1 = green, 3mm
Miscellaneous
K1 = DC barrel socket, 5A, 2.1mm diam.
K2,K3 = USB connector type A
K4 = USB connector type B
Hammond case 1593KBK
PCB Elektor 160494-1
Discussie (4 opmerking(en))