
Active, in-circuit capacitor tester smoothly connects parallel capacitors
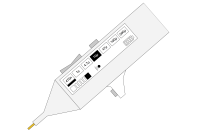
A test tool to assess the health of capacitors in-circuit by safely introducing test capacitors in parallel with those in the working DUT.
For anyone troubleshooting electronic equipment, the preponderance of capacitor-related faults make them a early, primary target when evaluating where certain problems might lie.
The difficulty I have had is that all the usual methods for determining the health of capacitors, particularly in-circuit, have their problems.
All diagnosis begins with the basics of looking, evaluating symptoms and measuring voltages but if the circuit is mostly functional, the effects of a bad capacitor can sometimes be hard to trace with only static tests. This is where a quick, go/no-go capacitor test on a live circuit would be very handy, to eliminate as many components as possible from the diagnosis in the early phases.
The concept for a new type of tester to address these situations is described in this project.
Short-circuited capacitors
This is a reliable test and there will be plenty of other signs that a capacitor is shorted. It has not been a particularly common fault for me but it is the easiest to detect.
In-circuit measurement of capacitance
This is fraught with problems depending on the circuit topology. False readings are common in power supplies and even when a reading is accurate, it’s not necessarily a good indication of capacitor health. I have measured plenty of capacitors that had clearly aged badly and had other measurable deficiencies but were well within tolerance.
In-circuit ESR readings
This is better but I have made ESR readings that look fine for capacitors that are visibly leaking or otherwise in a bad way which have serious problems besides a bad ESR. For old equipment, what is a ‘bad’ ESR value anyway? All the capacitors in the circuit will probably be reading a bit high but allow the circuit to function normally. Which is the one that is really bad?
In-circuit leakage testing
Most of the time this is not going to result in any definitive result because of the surrounding components. Getting the capacitor out and testing it will find these but at that point you are probably already close to a good reading of the fault.
In-circuit Tan-delta testers
These have much in common with ESR testing in that a large measure of interpretation is required. The test can either show that all the caps are bad or that all of them are good, depending on your chosen threshold. A known good capacitor of the same value, type and manufacturer is generally required to set that threshold properly and you are unlikely to have one handy. Age will skew the results even further.
If one deploys several of these tests on one component, you have an excellent probability of spotting the bad capacitor but it takes a long time.
Capacitor ‘popping’
In the valve days it was common to place a known good capacitor in parallel with a suspect one in the equipment, while it was working, and observe if it had an effect on the behaviour of the circuit. If the circuit responded positively to the connected capacitor, you could be on to a possible component failure. If nothing happened the component was probably good.
Given the voltages flying around, that test could be pretty hairy but it was a fast and a generally informative test. The inevitable current spikes didn’t usually do any damage.
In semiconductor circuits this is obviously very bad practice because it can do a lot of damage, so has disappeared from the techniques we commonly use. Connecting a large filter capacitor in parallel, while the equipment is turned off and then seeing if it makes any difference when turned on again is routine but it’s slow and fiddly. If the effect of the paralleled capacitor is obvious then great, you have learned something. If it’s more subtle, the time between tests becomes a limit to how useful a technique it is.
How popping can be brought into the modern era
I have been working on a test tool I call the CapCon that allows a test capacitor to be introduced into any circuit without ever generating a step or spike and can be used quickly across a board to determine if a capacitor in the region of interest is likely to be causing a problem.
Design Stages
Initially I wanted the test tool to be as simple as possible and not require any active components or power by just having a pair of switches connected to a trigger and a switchable selection of capacitors and charge resistors.
I built a few Breadboard versions of these according to a general formula shown in the attachment named Passive Circuit.
The internal capacitor is selected with switch SW3a and is normally shorted by Rx so that the soakage voltage is eliminated. SW3b selects a corresponding charge resistor Ry.
When the trigger, which operates on microswitch SW1 is pulled, it causes the capacitor to charge via the resistor Ry. When the trigger reaches the end of its travel, it operates microswitch SW2 to short out the charge resistor and fully connect the test capacitor into the DUT to minimise the ESR.
Releasing the trigger again reintroduces the charge resistor ending with disconnection and then discharge of the test capacitor.
For the larger capacitors, having to estimate the time between pulling the trigger and making full contact is of course the disadvantage of this design but is does the job reasonably well. With a little patience, only a small step in the charge current is seen at the start of the process and again when Ry is shorted. Pulling the trigger too fast would curtail the charging process and generate a current spike when SW2 is operated too early.
One partial solution would be to monitor the voltage across the charge resistor so that when it drops to a low level, the trigger action can be completed to full contact.
Substituting a potentiometer for the charging resistor, operated by the trigger, was better but the trigger delay problem was still there and using a pot for the currents around PSU capacitors was clearly not a good solution.
There is no protection for the test capacitors if the voltage applied is too high or the connection is reversed and eventually one will make a mistake, damaging the test tool or the DUT.
The active CapCon
I then looked at ways to automate the trigger process so that it was independent of the operator but these were not completely satisfactory, so I decided to finally get some experience with micro-controllers and design a fully automatic test tool that would manage the connection and disconnection of the test capacitor while protecting itself and the DUT from excessive voltages and reverse polarity.
To begin, I built the prototype circuit shown in the attachment named Active Circuit, consisting of an integrator and current sense amplifier which control a MOSFET to manage the charge current into the internal test capacitor.
When the trigger is pulled in this solution, by pressing and holding SW1, the integrator ramps the gate voltage of the MOSFET until it begins to conduct.
As the gate voltage continues its rise, the increasing current through Rx may cause the output of the current sense amp to also rise, limiting the gate voltage and therefore the charge current.
When the capacitor comes to the end of the charge phase, the current falls and the integrator is again allowed to rise to its maximum value, fully connecting the internal capacitor to the DUT.
The connection phase is illustrated by the attachment named Connection phase scope trace for this circuit.
As I started to experiment with the design, a number of advantages became apparent:
By adding circuits to detect maximum and reverse voltages, the internal test capacitors are protected by never being connected until these monitoring circuits are content.
Disconnection is rapid if an error condition is detected while a test capacitor is connected.
It’s fast to use and the DUT will respond immediately to the test capacitor if there is a problem. Because of the rate limited charge and discharge phases, it’s possible to bring the larger test capacitors in and out of the picture with the trigger and easily gauge the effect they are having.
Implementing these ideas in a complete circuit based around a micro might look something like the attachment named Block Diagram:
The internal capacitor(s) are selected with the various controls, described later. RLA1 normally connects a discharge resistor Rdis to all internal capacitors and all MOSFETs are normally on to dissipate any soakage voltage. This ensures that no pre-existing charge is applied to the DUT.
The test tool is connected to the DUT. Should either the Vrev or Vhi circuits go high, they signal the CPU to disable the trigger and show/sound an alert.
If no fault condition is detected, touching the trigger holds off all but the selected MOSFETs, engages RLA1 and starts the ramp of the gate voltages. If a significant current is detected flowing through Rsense, the ramp is not advanced again until the current falls. Progress of the connection phase is displayed to full contact.
Capacitor selection is disabled while the connection/disconnection phases are in progress.
When the trigger is released, the gate voltage is ramped down to zero at a faster rate than during the charge phase and RLA1 is then disabled. The MOSFETs are then all turned on to allow the internal capacitors to discharge via Rdis.
Should an error condition be detected at any time, the MOSFETs are immediately turned off and the relay disengaged. The input protection circuits should mitigate any serious excursions.
PSU: A negative supply will almost certainly be necessary to allow the reverse voltage detector to operate with small negative voltages.
The connection and disconnection phases are illustrated by the diagram in the attachment Connect - Disconnect Phases:
Current state of the project
I have used the above prototype circuits and they work well, connecting and disconnecting the test capacitor smoothly in situations where they are used in working linear or switch mode power supplies and for bypass capacitors in audio circuits.
I am getting up to speed with an Arduino-based control solution that will fulfil the requirements of the block diagram but I have to get a lot more experience with PWM outputs, driving displays and developing the UI in that environment where I am currently rather weak.
If anyone would like to collaborate on the design, I would appreciate it.
Design Notes
Possible User Interface
A well designed user interaction model will indicate the stages of connection, charge and completion visually or with tones, the chosen capacitor(s), the default capacitor configuration and any alarms.
Being able to follow the process of charge, connection and disconnection is important as these stages will not always occur at the same pace for every capacitor and for every DUT. Over-voltage or reverse voltage conditions have to be signalled clearly and unambiguously.
Being able to quickly choose the test capacitor, additional paralleled capacitors and the default capacitor is, of course, central to the efficient use of the CapCon.
Battery health needs to be monitored so that the test tool is not used with a failing battery.
My preliminary concepts are to have a rocker switch plus a Set button to choose and set the test capacitor, with long presses to set various additional functions as follows.
Control functions
I envisage a Select rocker switch, the arms of which cycle back and forth through the list of internal test capacitors. The Set button makes the currently chosen one active, adding to or subtracting from any previous selection.
A pistol-like trigger is a slightly more complex mechanical device but is very nice in use. A button is also fine.
Cycle/Set
Trigger
Disabled if any error condition is detected.
Displays and annunciators
One possible solution for the display and controls might be arranged as shown in the attachment Display and Controls:
A two-line or matrix LCD could handle all the capacitor selection options and display various status data.
This display may not be easy to see when buried in a piece of equipment, so I propose tones to indicate connection and disconnection phases. A long press on one of the rocker arms could enable/disable the sounder.
Alerts would be signalled by inverting the display, combined with a tone that cannot be overridden.
Improvements and further investigations
Fast disconnection
Can it be made as tolerant to abuse as a good multimeter?
There will be two ratings:
PSU - Design criteria
Component options
External capacitor option?
(v105)
The difficulty I have had is that all the usual methods for determining the health of capacitors, particularly in-circuit, have their problems.
All diagnosis begins with the basics of looking, evaluating symptoms and measuring voltages but if the circuit is mostly functional, the effects of a bad capacitor can sometimes be hard to trace with only static tests. This is where a quick, go/no-go capacitor test on a live circuit would be very handy, to eliminate as many components as possible from the diagnosis in the early phases.
The concept for a new type of tester to address these situations is described in this project.
Short-circuited capacitors
This is a reliable test and there will be plenty of other signs that a capacitor is shorted. It has not been a particularly common fault for me but it is the easiest to detect.
In-circuit measurement of capacitance
This is fraught with problems depending on the circuit topology. False readings are common in power supplies and even when a reading is accurate, it’s not necessarily a good indication of capacitor health. I have measured plenty of capacitors that had clearly aged badly and had other measurable deficiencies but were well within tolerance.
In-circuit ESR readings
This is better but I have made ESR readings that look fine for capacitors that are visibly leaking or otherwise in a bad way which have serious problems besides a bad ESR. For old equipment, what is a ‘bad’ ESR value anyway? All the capacitors in the circuit will probably be reading a bit high but allow the circuit to function normally. Which is the one that is really bad?
In-circuit leakage testing
Most of the time this is not going to result in any definitive result because of the surrounding components. Getting the capacitor out and testing it will find these but at that point you are probably already close to a good reading of the fault.
In-circuit Tan-delta testers
These have much in common with ESR testing in that a large measure of interpretation is required. The test can either show that all the caps are bad or that all of them are good, depending on your chosen threshold. A known good capacitor of the same value, type and manufacturer is generally required to set that threshold properly and you are unlikely to have one handy. Age will skew the results even further.
If one deploys several of these tests on one component, you have an excellent probability of spotting the bad capacitor but it takes a long time.
Capacitor ‘popping’
In the valve days it was common to place a known good capacitor in parallel with a suspect one in the equipment, while it was working, and observe if it had an effect on the behaviour of the circuit. If the circuit responded positively to the connected capacitor, you could be on to a possible component failure. If nothing happened the component was probably good.
Given the voltages flying around, that test could be pretty hairy but it was a fast and a generally informative test. The inevitable current spikes didn’t usually do any damage.
In semiconductor circuits this is obviously very bad practice because it can do a lot of damage, so has disappeared from the techniques we commonly use. Connecting a large filter capacitor in parallel, while the equipment is turned off and then seeing if it makes any difference when turned on again is routine but it’s slow and fiddly. If the effect of the paralleled capacitor is obvious then great, you have learned something. If it’s more subtle, the time between tests becomes a limit to how useful a technique it is.
How popping can be brought into the modern era
I have been working on a test tool I call the CapCon that allows a test capacitor to be introduced into any circuit without ever generating a step or spike and can be used quickly across a board to determine if a capacitor in the region of interest is likely to be causing a problem.
Design Stages
Initially I wanted the test tool to be as simple as possible and not require any active components or power by just having a pair of switches connected to a trigger and a switchable selection of capacitors and charge resistors.
I built a few Breadboard versions of these according to a general formula shown in the attachment named Passive Circuit.
The internal capacitor is selected with switch SW3a and is normally shorted by Rx so that the soakage voltage is eliminated. SW3b selects a corresponding charge resistor Ry.
When the trigger, which operates on microswitch SW1 is pulled, it causes the capacitor to charge via the resistor Ry. When the trigger reaches the end of its travel, it operates microswitch SW2 to short out the charge resistor and fully connect the test capacitor into the DUT to minimise the ESR.
Releasing the trigger again reintroduces the charge resistor ending with disconnection and then discharge of the test capacitor.
For the larger capacitors, having to estimate the time between pulling the trigger and making full contact is of course the disadvantage of this design but is does the job reasonably well. With a little patience, only a small step in the charge current is seen at the start of the process and again when Ry is shorted. Pulling the trigger too fast would curtail the charging process and generate a current spike when SW2 is operated too early.
One partial solution would be to monitor the voltage across the charge resistor so that when it drops to a low level, the trigger action can be completed to full contact.
Substituting a potentiometer for the charging resistor, operated by the trigger, was better but the trigger delay problem was still there and using a pot for the currents around PSU capacitors was clearly not a good solution.
There is no protection for the test capacitors if the voltage applied is too high or the connection is reversed and eventually one will make a mistake, damaging the test tool or the DUT.
The active CapCon
I then looked at ways to automate the trigger process so that it was independent of the operator but these were not completely satisfactory, so I decided to finally get some experience with micro-controllers and design a fully automatic test tool that would manage the connection and disconnection of the test capacitor while protecting itself and the DUT from excessive voltages and reverse polarity.
To begin, I built the prototype circuit shown in the attachment named Active Circuit, consisting of an integrator and current sense amplifier which control a MOSFET to manage the charge current into the internal test capacitor.
When the trigger is pulled in this solution, by pressing and holding SW1, the integrator ramps the gate voltage of the MOSFET until it begins to conduct.
As the gate voltage continues its rise, the increasing current through Rx may cause the output of the current sense amp to also rise, limiting the gate voltage and therefore the charge current.
When the capacitor comes to the end of the charge phase, the current falls and the integrator is again allowed to rise to its maximum value, fully connecting the internal capacitor to the DUT.
The connection phase is illustrated by the attachment named Connection phase scope trace for this circuit.
As I started to experiment with the design, a number of advantages became apparent:
- No matter how large the test capacitor, it can be connected in parallel with an active circuit with no damaging current spikes of any kind. The test capacitor is ‘blended’ into and out of the active circuit.
- Expensive and bulky switches can be replaced with individual MOSFETs rated for the power they have to handle. The ramp from the integrator handles variations in the MOSFET gate threshold voltages and always completes to deliver the full gate voltage for best RdsON.
- One or more capacitors can be connected in parallel, increasing the number of different values available for testing and opening up some interesting experiments that can be conducted on the DUT.
- The charge rate could be modified by adjusting the charge slope to track the measured voltage and the capacitor value, making the test as fast as possible in each case.
- A decent user interface will show the stages of connection, charge and completion visually and with tones, if desired.
By adding circuits to detect maximum and reverse voltages, the internal test capacitors are protected by never being connected until these monitoring circuits are content.
Disconnection is rapid if an error condition is detected while a test capacitor is connected.
It’s fast to use and the DUT will respond immediately to the test capacitor if there is a problem. Because of the rate limited charge and discharge phases, it’s possible to bring the larger test capacitors in and out of the picture with the trigger and easily gauge the effect they are having.
Implementing these ideas in a complete circuit based around a micro might look something like the attachment named Block Diagram:
The internal capacitor(s) are selected with the various controls, described later. RLA1 normally connects a discharge resistor Rdis to all internal capacitors and all MOSFETs are normally on to dissipate any soakage voltage. This ensures that no pre-existing charge is applied to the DUT.
The test tool is connected to the DUT. Should either the Vrev or Vhi circuits go high, they signal the CPU to disable the trigger and show/sound an alert.
If no fault condition is detected, touching the trigger holds off all but the selected MOSFETs, engages RLA1 and starts the ramp of the gate voltages. If a significant current is detected flowing through Rsense, the ramp is not advanced again until the current falls. Progress of the connection phase is displayed to full contact.
Capacitor selection is disabled while the connection/disconnection phases are in progress.
When the trigger is released, the gate voltage is ramped down to zero at a faster rate than during the charge phase and RLA1 is then disabled. The MOSFETs are then all turned on to allow the internal capacitors to discharge via Rdis.
Should an error condition be detected at any time, the MOSFETs are immediately turned off and the relay disengaged. The input protection circuits should mitigate any serious excursions.
PSU: A negative supply will almost certainly be necessary to allow the reverse voltage detector to operate with small negative voltages.
The connection and disconnection phases are illustrated by the diagram in the attachment Connect - Disconnect Phases:
Current state of the project
I have used the above prototype circuits and they work well, connecting and disconnecting the test capacitor smoothly in situations where they are used in working linear or switch mode power supplies and for bypass capacitors in audio circuits.
I am getting up to speed with an Arduino-based control solution that will fulfil the requirements of the block diagram but I have to get a lot more experience with PWM outputs, driving displays and developing the UI in that environment where I am currently rather weak.
If anyone would like to collaborate on the design, I would appreciate it.
Design Notes
Possible User Interface
A well designed user interaction model will indicate the stages of connection, charge and completion visually or with tones, the chosen capacitor(s), the default capacitor configuration and any alarms.
Being able to follow the process of charge, connection and disconnection is important as these stages will not always occur at the same pace for every capacitor and for every DUT. Over-voltage or reverse voltage conditions have to be signalled clearly and unambiguously.
Being able to quickly choose the test capacitor, additional paralleled capacitors and the default capacitor is, of course, central to the efficient use of the CapCon.
Battery health needs to be monitored so that the test tool is not used with a failing battery.
My preliminary concepts are to have a rocker switch plus a Set button to choose and set the test capacitor, with long presses to set various additional functions as follows.
Control functions
I envisage a Select rocker switch, the arms of which cycle back and forth through the list of internal test capacitors. The Set button makes the currently chosen one active, adding to or subtracting from any previous selection.
A pistol-like trigger is a slightly more complex mechanical device but is very nice in use. A button is also fine.
Cycle/Set
- The two actions of the rocker for capacitor control are:
- A short click of the Select rocker highlights each available capacitor in turn, back or forwards.
- A short click of the Set button chooses/adds/removes the selected capacitor.
- A long hold on the Set button sets the default capacitor to be used when the test tool starts up.
Trigger
Disabled if any error condition is detected.
- Pull and hold to connect the already discharged test capacitor until the test tool confirms full connection.
- Release to initiate disconnection, ending with all capacitors being discharged.
- If the trigger is released at any time while the test tool is connecting, the process is instantly reversed.
- If the trigger is activated again while the disconnect sequence is in progress, it would be best if the sequence completed to discharge the internal capacitor. Transferring its residual charge to a different circuit could be damaging.
- If over-voltage or reverse voltage is detected at any time, the gate voltages are immediately shut down and the relay disconnected, regardless of the state of the trigger.
- A fuse protects the DUT circuit if an internal capacitor becomes shorted (in conjunction with the input protection circuits).
- The trigger switch needs to be something that is going to last, so a hall sensor activated by a small magnet in the trigger looks like a good solution. It also gives a clean logic output, saving extra components and code to handle debounce.
Displays and annunciators
One possible solution for the display and controls might be arranged as shown in the attachment Display and Controls:
A two-line or matrix LCD could handle all the capacitor selection options and display various status data.
This display may not be easy to see when buried in a piece of equipment, so I propose tones to indicate connection and disconnection phases. A long press on one of the rocker arms could enable/disable the sounder.
Alerts would be signalled by inverting the display, combined with a tone that cannot be overridden.
Improvements and further investigations
- None of the components in the prototype circuits are as yet optimised, they were simply what I had in stock to build a proof of concept.
- Is it necessary for the current sense resistor to be shorted out when charge is complete for best ESR? If it can be kept small, say <0.3Ω, the effect that it has on the circuit behaviour should be swamped by the introduction of the test capacitor across the DUT. If the test tool is being used to experiment with introducing different capacitor values where none already exists, it might be another matter.
- Would increasing the maximum input voltage beyond 50V make for a too serious challenge for the project?
- The supply voltage of the test circuit of 7V is set to provide sufficient drive for the MOSFET but there are alternative approaches that need to be explored to maximise this parameter but reduce power consumption overall.
Fast disconnection
- If a voltage fault condition is detected while a capacitor is connected, the relay will be slow to react, so turning off all the MOSFETs is the priority while waiting for the relay to disengage.
- The input protection circuit should handle the insult while this happens.
- Add input protection devices to the two voltage sensing points?
Can it be made as tolerant to abuse as a good multimeter?
- There could be some very juicy voltages circulating in some of the equipment that the CapCon will be used in, so it had better be pretty good.
- It might be considered to be very close to the environment that a multimeter would be used, so the same construction techniques are probably necessary.
- This includes isolation slots, MOVs, a fuse etc. to make sure the operator is protected, if not the test tool.
- It might be correct to establish a CAT rating for the test tool so it's clear what the maximum conditions and environment are for the user.
There will be two ratings:
- The maximum allowable voltage that can be used to connect the internal capacitors, which will probably be 50V, using 63V internal components.
- The absolute maximum rating for the connection of the test tool to any circuit. Probably mains voltage rated.
PSU - Design criteria
- A battery holder for primary or rechargeable cells would be my preference. AAA or PP3 would make for a compact source.
- A polyswitch on the battery.
- Battery reversal protection using a MOSFET, for the lowest drop out and therefore best battery life. Strive for the lowest terminal battery voltage that can be achieved.
- A low-current negative supply is required, so a capacitor switcher seems like a reasonable approach.
- PSU noise on the negative supply should not affect the reference or measurement of currents through the sense resistor.
Component options
- Logic level MOSFETs look OK for this design but will they deliver the best RdsON?
- The choice of the enhancement-mode N-Channel IGFET will depend on it's performance in the ohmic part of the envelope. The old BUZ11A already does a very good job in the prototype, so it's a matter of finding a modern part that does better than this and is more compact. Dissipation is very low.
- 63V capacitors of good quality throughout.
- Logic-level relay for RLA1 for minimum power consumption. Power-saving circuits are also possible.
External capacitor option?
- One of the setting options might be to connect an external capacitor with a higher voltage rating, such as the really big ones in some power amplifiers, which cannot be accommodated internally to the test tool.
- This setting would also change the highest permitted input voltage to the maximum allowed by the circuitry and the user is responsible for not blowing it up!
- The issue here is that one is in a different voltage regime above 50V that might be a different set of regulations and tests, which might become problematic.
(v105)
Discussie (0 opmerking(en))