
Air pollution display, Solar power, Wifi data upload:
For many of us, air pollution is a daily problem.People are talking about the level of the pm2.5 before going out or before doing sport.Living in such city, I wanted to know what is the pollution level around my apartment, or even inside the apartment.
For many of us, air pollution is a daily problem.
People are talking about the level of the pm2.5 before going out or before doing sport.
Living in such city, I wanted to know what is the pollution level around my apartment, or even inside the apartment.
Looking to different sensor, I bought a Sharp one (not very expensive) GP2Y10. This sensor is low consumption (there is some other sensor but higher current needed).
The principle is to use some IR led and measure the reflection of the IR on the air dust. They claimed to measure the PM2.5 which are 2.5 um size of the dust.
The project here, is to put the detector outside, power by the sun, and display with LED the level of pollution and the trend.
The first version, which is more a trial, is to connect the sensor to a PIC and display the PM2.5 following the datasheet instruction and some formula found on internet.
For the sensor itself, I put it inside a close box, with a hole to let the air going IN and a small fan to vacuum the air from inside the box to outside. With this system, I'm sure that the air will go through the sensor.
The current result is working. On some picture, we can see the dust level is close to 0 or 1. Using the smoke of a match, it is raising to 300-500 (500 is the max).
The next improvement will be:
- Command the fan every minute
- Make the measurement every minutes during 10 sec
- Make the rolling average and display on some LED
- add the solar power supply and lithium battery
Update July 20th, 2015:- Mockup done and working
- For the charging lithium part, I decide to not use a dedicated circuit but make it in discrete. I use an IC LM2931CT with limited voltage at 4.2V. Some adjustment done to avoid the battery leakage current. I tried to use low consumption LP2931CT but cannot find it here.
- For the boost circuit, from 3.8v to 5v (no choice, the Sharp sensor need 5v), I choose first an pump capacitor IC, Max682. It is working but I found that the standby current is 10mA, which is too high. Later, I'll change with another version, probabely Max1723.
- The display is bargraph (so far only the dot function is writen), with 8 led, low current, 3 green, 3 yellow, 2 red
- The uC is still an PIC18F2420. As I want to limit the consumption and possible to display the 7 segments or the LED, the SW went to sleep after each task and wake up with the watchdog, set at 4ms.
- The Sw already works for real time display of the number of particules in the air. Display on the 7 segments and on the bargraph with a dot
=> Next development:
- Impletmentation of the voltage control with the MAX931
- Implementation of the button and command of the fan+sensor
- Improve user interface with different option on the sampling period and display option
Update July 22nd:
- add the light sensor and energy saving for the night. Only short flash display
- add the fan for air extract in the final enclosure
- Add 1 button, one for sampling choice (instant, min, 10 min, 30 min, 1 hour)
- Add one button for display choice (dot / 7 segments or both)
- Add display every 2 min of the max and min of the last 24h
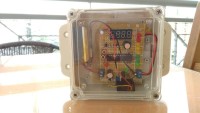
- Put in a box outside for test. See the picture hereafter for more detail
Next improvement:
=> add 2 buttons waterproof outside for avoid open the box when need change display or sampling choice
=> still some small bug to be corrected
=> thinking to add a wifi module for upload to a server...
Update July 28th:
- Add the Max931 for switch ON and switch OFF the DC-DC booster, with hysteresis.
- Working well on a balcony now, sun charging, one measurement every 30 min, display min-max of the last 24h every 2 min + when the LDR detect night to day mode
=> Almost the end of this version. Still need change the booster DC-DC to a LC one to reduce by 10mA the standby consumption
Update August 4th: Wifi option:
- Working on the Wifi data upload. Found 2 modules UART-Wifi. Try to use the cheaper one first, ES8266. Small, low consumption, great price. Many doc (too much ?) on internet.

- Tried to change for different firmware to find one suitable. Not easy as lot of different information on internet.
- After register the SSID and password, can be automaticely register after switch off. Just need to record SSID-password in the PIC.
- Will have to remove one LED to use the Wifi module selection because the Tx-Rx lines already used as I/O
- Plan to use the www.thingspeak.com as data collection and display. Already succeed to send some data "by hand".
- Need now to integrate into the box and write the software...
Update August 22nd, 2015:
- Quite some difficulties to use the Wifi module ES8266. Made many test with PC first, then connect to the PIC and using an UART-USB as spy. Finally, after dozen and dozen of tries, I found the right syntax to send some date over internet
- Now, every 10 min, the PIC wake up the Wifi module and send the current pollution dust value to the website www.thingspeak.com
- The module keep the last wifi connexion. Need find later an easy way to send the data over the Uart.
- I made it public and it can be seen there:
https://thingspeak.com/channels/49795
- Then, as the module need 3.3v, need the right power supply with the current requirement: >=200mA, low dropout, must be ON-OFF command. I plan later to build it but at this moment, I use an IC LP2992IM in 3.3v. TSOP23. Not easy to solder on the board...
Update Sept 3rd:
- Some issue with the solar charger circuit based on the LM2931CT. Made many tests to find that this IC, under 4.9V Vin, drain all possible input current, which block the panel to increase the voltage. A solution is find with a simple voltage detector based on an NPN which disable the LM (via the enable pin) until Vin is around 5V. More description on the other project about simple charger.
Laurent
Want to build a project?
Bring your design to life with the Elektor PCB Service, powered by Eurocircuits. Upload the project files and order professionally manufactured PCBs or assembled boards through a proven European production platform.
Supporting KiCad, Eagle, Gerber, and ODB++ formats, the service is suitable for everything from prototypes and validation builds to series production and volume manufacturing.
Made in Europe. Fast. Reliable. Professional.
Updates van de auteur