
Arduino Jingle Bells tune player
Play the "Jingle Bells" or the "Mission Impossible" tune using one digital output of the Arduino, connected to a little speaker.
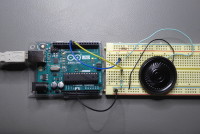
Because it's almost Christmas, i thought it was a good time to turn an Arduino into a simple tune player that can play the Jingle Bells tune. I also added the Mission Impossible tune, that can be selected by pulling a digital input low.
A digital output on the Arduino can be used to play a melody. Therefore the digital output is programmed to generate a square waves with the frequencies of the musical notes that we want to produce.
To produce a melody, not only note frequencies, but also the length of each note and the pause between the notes have to be taken into account.
In the following little project i implemented 2 melodies using the Arduino Uno.
The notes, note lengths and note pauses were derived from MIDI files of the 2 tunes. Because the melodies are rather simple, the notes were extracted manually using a MIDI file editor and put into individual arrays. These arrays are parsed by a sequencer that plays the notes.
To generate the square wave output i used the TimerOne library which is included in the firmware download as a TimerOne.cpp and a TimerOne.h file.
These 2 files should be placed in the same folder as the Arduino sketch.
The TimerOne class uses the Timer1 interrupt to generate PWM signals with a programmable period and duty cycle. The duty cycle is set to 50% to get a square wave.
A digital input is used to select one of the 2 melodies. The internal pullup of the input is switched on, so the input is high when the switch is open en low when the switch is closed.
When the switch is open, the JINGLE BELLS tune is played and when the switch is closed, the MISSION IMPOSSIBLE tune is played,
So when you only want to play the JINGLE BELLS tune, you can leave out the switch and R4. R4 is added to limit the current to protect the pin when it would be programmed as an output by mistake.
The digital output pin that produces the square wave melody can not source enough current to drive a 4 or 8 Ohm speaker directly, so R3 is added to limit the current so it stays below the absolute maximum
of 40mA.
When earphones are used, the current is lowered by R2 in series with a 10K potmeter R1. The volume for the earphones can be set by R1 and R2 limits the current when R1 is set to 0 ohms.
Want to build a project?
Bring your design to life with the Elektor PCB Service, powered by Eurocircuits. Upload the project files and order professionally manufactured PCBs or assembled boards through a proven European production platform.
Supporting KiCad, Eagle, Gerber, and ODB++ formats, the service is suitable for everything from prototypes and validation builds to series production and volume manufacturing.
Made in Europe. Fast. Reliable. Professional.
Discussie (0 opmerking(en))