
Batteryless Long Range Smart Camera for Face Detection
I introduce a batteryless smart camera for face detection exploiting the MAX78000 chip
In this project I propose a long range battery less smart camera that performs face recognition at the edge. The summary of my project goes as follows:
1. Network Architecture Search (NAS) to find the best fitting net
I first defined my goal: perform face recognition over 5 different faces in an extremely efficient but still meaningful way, i.e. with good accuracy. To achieve such, I started from the famous CelebA dataset and tested different network configurations, changing the number of filters/neurons in the convolutional and dense layers, as well and the input image size. I then computed the network size with a mathematical model to filter out the network that would not fit on the target hardware and then trained the remaining networks. Eventually, the network with the best tradeoff between size (and thus latency) and accuracy was the following (here in ASCII, in a more visual way in Figure 1):
Layer 0: 1x30x40 (CHW data), no pooling, conv2d with kernel size 3x3, stride 1/1, pad 0/0, 32x28x38 output
Layer 1: 32x28x38 (HWC data), no pooling, conv2d with kernel size 3x3, stride 1/1, pad 0/0, 24x26x36 output
Layer 2: 24x26x36 (HWC data), 2x2 max pool with stride 2/2, conv2d with kernel size 3x3, stride 1/1, pad 0/0, 24x11x16 output
Layer 3: 24x11x16 (HWC data), no pooling, conv2d with kernel size 3x3, stride 1/1, pad 0/0, 24x9x14 output
Layer 4: 24x9x14 (HWC data), 2x2 max pool with stride 2/2, no convolution, 24x4x7 output
Layer 5: 24x4x7 (flattened to 672x1x1, HWC data), no pooling, linear with kernel size 1x1, stride 1/1, pad 0/0, 32x1x1 output
Layer 6: 32x1x1 (flattened to 32x1x1, HWC data), no pooling, linear with kernel size 1x1, stride 1/1, pad 0/0, 16x1x1 output
Layer 7: 16x1x1 (flattened to 16x1x1, HWC data), no pooling, linear with kernel size 1x1, stride 1/1, pad 0/0, 5x1x1 output
Since the samples from the CelebA dataset are relatively few, about 20-30 per subject (class), I proceed to do some data augmentation. In particular, I applied a +-10 and +-20 degrees rotation to the images and a gamma transform (coefficients: 0.1, 0.4, 1, 2.5, 5) to change the exposure of the images to help the net generalize towards different subject orientation and light conditions. The output of such augmentation can be seen in Figure 2.
The results were surprisingly good. The confusion matrix is provided below in ASCII and in a more graphical way in Fig. 3. I achieved 98% accuracy on the test split of the dataset, with less than 40k parameters.
[[81 0 0 1 0]
[ 0 81 0 1 3]
[ 0 4 33 2 0]
[ 0 1 0 70 0]
[ 0 0 0 0 73]]
2. Implementation of the net on the hardware
To implement the net on the MAX78000 I relied on PyTorch and the toolchain provided by Maxim. In particular, to achieve the maximum accuracy, I choose to use the Quantization Aware Training, provided by Maxim as well. It worked flawlessly and I managed to higher the accuracy of my model of about 5% with respect to the post training quantization approach. I am also convinced that the margin between QAT and post training quantization will be higher as the quantization gets deeper, for 4, 2 and 1 bit networks. In the GitHub repo (neural_net branch) linked at the end of this page there are all the files needed to reproduce the training: the Dataloader, the Network itself and the prepackaged augmented data in a convient .npy binary format.
3. Augmentation of the network with a camera and LoRa wireless module
The model was first validated with the images from the test dataset on the board using an GUI-based image sender I coded in Python, available in ref. 2. After that, the fun began!
I exploited the onboard camera (OV7692) of the MAX78000 feather to capture an image, then I resized it, fed in the neural network and send the end result over LoRa wireless communication.
A new dataset has then been created with images shot with the OV7692 camera and the network retrained on my friends' and my own faces, and then deployed on the MAX78000 for the demo :D
The flow of the code is as follows:
4. Low power system design (where the fun continues)
To get this project even more challenging I decided to make my smart camera completely battery less. This means that is powered only from solar panels! It is not an easy task as the power consumption of the node is not constant in time, and a solar panel would be huge to supply the 100mW peak power required during the neural network inference!
Instead, I used a smaller solar panel array, of about 50mW in optimal conditions, and some capacitors as a buffer of energy to support the chip in the most power-hungry operations.
Moreover, to extract every bit of energy from the solar cell we use the BQ25504 from TI that runs a maximum power point algorithm: it adapts the input impedance of the boost charger to match the output impedance of the solar panel to achieve maximum power transfer.
Let’s now dive into the firmware loaded on the MAX78000. Power efficiency was a crucial point of my project, so I analyzed the schematic of the Feather board and found a PMIC (Power Management IC), the MAX20303 from Maxim. This IC hosts a number of LDOs, Buck and Boosts converters, which can be individually powered off to enhance the low power performance of the board. I thus used this IC to power-gate the on-board camera when not needed by shutting off LDO2. I also wrote a driver for the stereo audio amplifier IC, the MAX9867, to put it in the lowest power mode.
All the code is present on the GitHub repo. I also included a driver for the LoRa SX1261 chip in the hope that they will be of help to further people endeavoring in AI-powered low power wireless networks :)
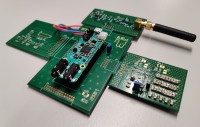
5. System integration on a custom PCB
Let’s start taking a look at the custom PCB designed in Figure 5 and Figure 6. The board host at his heart the Max78000 feather board and was designed with modularity in mind. It is clearly divided in subcircuits, which can be easily snapped off in case they are not needed, and then reattached via standard 2.54mm pin headers. At the bottom of the board there is also a breakout connector that routes all the pins of the MAX78000 board, to not preclude any further extensions.
Designing the LoRa module by myself was a very nice and instructive challenge. The trace width was controlled to grant a uniform impedance of 50Ohm over the full length of the transmission line, from the IC until the SMA connector. Other high speed signal routing techniques were adopted, as ground plane clearance around the RF path, via stitching and droplets on the components-to-trace connections. I was amazed how the study and work done on the RF part worked out super well! All the schematics and the PCB is present as well on the GitHub repo in the "hardware" branch.
There is also a third PCB panel, but ssh! That’s secret! :D It is intended for further development, using an even lower power camera and a Time Of Flight (ToF) sensor to automate the image acquisition.
6. Conclusion
I would like to conclude with a funny video of me showcasing the final version of the sensor node. In the video the sensor node is attached to a wall while a computer stays next to it running a python script. A development board with a LoRa shield is connected to the computer and is continuously listening for LoRa packets containing the inferred class: when a LoRa packet arrives the python script looks in a database and displays the image corresponding to the face inferred.
This method of face identification has great benefit in terms of:
Lastly, I would like to thank Elektor and Maxim for this amazing competition and for the opportunity to get to know the MAX78000 chip and play a bit with it, and Dr. Michele Magno for advertising me this competition and supporting my application.
Enjoy!
https://youtu.be/TvuLv13EGlM
Ref. 1: https://github.com/Sixaxis9/Face_ID_Maxim78000
Ref. 2: https://github.com/Sixaxis9/Microcontroller-Image-Sender
- Network Architecture Search (NAS) to find the best fitting net
- Implementation of the net on the MAX78000 with Quantization Aware Training (QAT)
- Augmentation of the demo with a camera and LoRa wireless module
- Low Power System Design
- System integration on a custom PCB
- Conclusion and final demonstration
1. Network Architecture Search (NAS) to find the best fitting net
I first defined my goal: perform face recognition over 5 different faces in an extremely efficient but still meaningful way, i.e. with good accuracy. To achieve such, I started from the famous CelebA dataset and tested different network configurations, changing the number of filters/neurons in the convolutional and dense layers, as well and the input image size. I then computed the network size with a mathematical model to filter out the network that would not fit on the target hardware and then trained the remaining networks. Eventually, the network with the best tradeoff between size (and thus latency) and accuracy was the following (here in ASCII, in a more visual way in Figure 1):
Layer 0: 1x30x40 (CHW data), no pooling, conv2d with kernel size 3x3, stride 1/1, pad 0/0, 32x28x38 output
Layer 1: 32x28x38 (HWC data), no pooling, conv2d with kernel size 3x3, stride 1/1, pad 0/0, 24x26x36 output
Layer 2: 24x26x36 (HWC data), 2x2 max pool with stride 2/2, conv2d with kernel size 3x3, stride 1/1, pad 0/0, 24x11x16 output
Layer 3: 24x11x16 (HWC data), no pooling, conv2d with kernel size 3x3, stride 1/1, pad 0/0, 24x9x14 output
Layer 4: 24x9x14 (HWC data), 2x2 max pool with stride 2/2, no convolution, 24x4x7 output
Layer 5: 24x4x7 (flattened to 672x1x1, HWC data), no pooling, linear with kernel size 1x1, stride 1/1, pad 0/0, 32x1x1 output
Layer 6: 32x1x1 (flattened to 32x1x1, HWC data), no pooling, linear with kernel size 1x1, stride 1/1, pad 0/0, 16x1x1 output
Layer 7: 16x1x1 (flattened to 16x1x1, HWC data), no pooling, linear with kernel size 1x1, stride 1/1, pad 0/0, 5x1x1 output
Since the samples from the CelebA dataset are relatively few, about 20-30 per subject (class), I proceed to do some data augmentation. In particular, I applied a +-10 and +-20 degrees rotation to the images and a gamma transform (coefficients: 0.1, 0.4, 1, 2.5, 5) to change the exposure of the images to help the net generalize towards different subject orientation and light conditions. The output of such augmentation can be seen in Figure 2.
The results were surprisingly good. The confusion matrix is provided below in ASCII and in a more graphical way in Fig. 3. I achieved 98% accuracy on the test split of the dataset, with less than 40k parameters.
[[81 0 0 1 0]
[ 0 81 0 1 3]
[ 0 4 33 2 0]
[ 0 1 0 70 0]
[ 0 0 0 0 73]]
2. Implementation of the net on the hardware
To implement the net on the MAX78000 I relied on PyTorch and the toolchain provided by Maxim. In particular, to achieve the maximum accuracy, I choose to use the Quantization Aware Training, provided by Maxim as well. It worked flawlessly and I managed to higher the accuracy of my model of about 5% with respect to the post training quantization approach. I am also convinced that the margin between QAT and post training quantization will be higher as the quantization gets deeper, for 4, 2 and 1 bit networks. In the GitHub repo (neural_net branch) linked at the end of this page there are all the files needed to reproduce the training: the Dataloader, the Network itself and the prepackaged augmented data in a convient .npy binary format.
3. Augmentation of the network with a camera and LoRa wireless module
The model was first validated with the images from the test dataset on the board using an GUI-based image sender I coded in Python, available in ref. 2. After that, the fun began!
I exploited the onboard camera (OV7692) of the MAX78000 feather to capture an image, then I resized it, fed in the neural network and send the end result over LoRa wireless communication.
A new dataset has then been created with images shot with the OV7692 camera and the network retrained on my friends' and my own faces, and then deployed on the MAX78000 for the demo :D
The flow of the code is as follows:
- The MAX78000 wakes up from low power mode
- The camera is powered on and initialised
- A picture is taken and camera is power gated
- The picture is resized
- The neural network is run
- The end result is sent over LoRa
- The node goes back in sleep mode (uC and LoRa)
4. Low power system design (where the fun continues)
To get this project even more challenging I decided to make my smart camera completely battery less. This means that is powered only from solar panels! It is not an easy task as the power consumption of the node is not constant in time, and a solar panel would be huge to supply the 100mW peak power required during the neural network inference!
Instead, I used a smaller solar panel array, of about 50mW in optimal conditions, and some capacitors as a buffer of energy to support the chip in the most power-hungry operations.
Moreover, to extract every bit of energy from the solar cell we use the BQ25504 from TI that runs a maximum power point algorithm: it adapts the input impedance of the boost charger to match the output impedance of the solar panel to achieve maximum power transfer.
Let’s now dive into the firmware loaded on the MAX78000. Power efficiency was a crucial point of my project, so I analyzed the schematic of the Feather board and found a PMIC (Power Management IC), the MAX20303 from Maxim. This IC hosts a number of LDOs, Buck and Boosts converters, which can be individually powered off to enhance the low power performance of the board. I thus used this IC to power-gate the on-board camera when not needed by shutting off LDO2. I also wrote a driver for the stereo audio amplifier IC, the MAX9867, to put it in the lowest power mode.
All the code is present on the GitHub repo. I also included a driver for the LoRa SX1261 chip in the hope that they will be of help to further people endeavoring in AI-powered low power wireless networks :)
5. System integration on a custom PCB
Let’s start taking a look at the custom PCB designed in Figure 5 and Figure 6. The board host at his heart the Max78000 feather board and was designed with modularity in mind. It is clearly divided in subcircuits, which can be easily snapped off in case they are not needed, and then reattached via standard 2.54mm pin headers. At the bottom of the board there is also a breakout connector that routes all the pins of the MAX78000 board, to not preclude any further extensions.
Designing the LoRa module by myself was a very nice and instructive challenge. The trace width was controlled to grant a uniform impedance of 50Ohm over the full length of the transmission line, from the IC until the SMA connector. Other high speed signal routing techniques were adopted, as ground plane clearance around the RF path, via stitching and droplets on the components-to-trace connections. I was amazed how the study and work done on the RF part worked out super well! All the schematics and the PCB is present as well on the GitHub repo in the "hardware" branch.
There is also a third PCB panel, but ssh! That’s secret! :D It is intended for further development, using an even lower power camera and a Time Of Flight (ToF) sensor to automate the image acquisition.
6. Conclusion
I would like to conclude with a funny video of me showcasing the final version of the sensor node. In the video the sensor node is attached to a wall while a computer stays next to it running a python script. A development board with a LoRa shield is connected to the computer and is continuously listening for LoRa packets containing the inferred class: when a LoRa packet arrives the python script looks in a database and displays the image corresponding to the face inferred.
This method of face identification has great benefit in terms of:
- Privacy: images of people's faces are not sent over the air.
- Latency: computing the neural network is way faster, with an accelerator as the MAX78000, than sending the picture to a server.
- Power: RF transmission is very power consuming, while hardware accelerators as the MAX78000 target ultra low power efficiency.
Lastly, I would like to thank Elektor and Maxim for this amazing competition and for the opportunity to get to know the MAX78000 chip and play a bit with it, and Dr. Michele Magno for advertising me this competition and supporting my application.
Enjoy!
https://youtu.be/TvuLv13EGlM
Ref. 1: https://github.com/Sixaxis9/Face_ID_Maxim78000
Ref. 2: https://github.com/Sixaxis9/Microcontroller-Image-Sender
Want to build a project?
Bring your design to life with the Elektor PCB Service, powered by Eurocircuits. Upload the project files and order professionally manufactured PCBs or assembled boards through a proven European production platform.
Supporting KiCad, Eagle, Gerber, and ODB++ formats, the service is suitable for everything from prototypes and validation builds to series production and volume manufacturing.
Made in Europe. Fast. Reliable. Professional.
Updates van de auteur