
CubeNuke IoT Learning Platforms
The open source/open hardware website for this project is here.Thank you to the editorial staff at Elektor for allowing me to post this project here at Elektor-Labs!
The open source/open hardware website for this project is here.
Thank you to the editorial staff at Elektor for allowing me to post this project here at Elektor-Labs!
Update 6.7.2015: We have been busy at SuperLab.TV over the past year moving to a new home and continuing to create and update our IoT platforms. We have also decided to "brand" our open-source platforms as "CubeNukes (tm)". Our latest model is being developed around multiple types of communications (ip telephone, cellphone, Skype and LiFi).
Update 5.20.2014: Changing the project title from Advanced Learning Platforms to IoT Learning Platforms. I think this will better represent the type and purpose of these platforms.
Update 5.11.2014: We were able to locate a rubber "Pipe Cap" with a large radiator-type clamp to secure the base of the acrylic tube filled with mineral oil. This looks to be a much more durable solution to keep the tube from leaking any oil. Posting some pics here on Elektor of the new cap and clamp as well as a picture of what the Raspberry Pi and wiring acrylic insert looks like when removed.
Update 5.8.2014: Quick update. The Raspberry Pi Model B we've had submerged in mineral oil for six months has not been affected at all by the mineral oil. This includes the SD card being submerged as well. Yesterday I noticed that the mineral oil was beginning to seep upward from the base of the platform up along the outside of the acrylic tube. This could mean that I did not apply the bonding glue correctly to the tube and PVC base or the glue reacted to the mineral oil in some way which has casued it to lose its bond. We would have selected a glass tube with a sealed bottom to use but wanted to avoid the possibility of the glass breaking. We will try some other techniques and post the results when available.
Update 4.28.2014: Recently built a new plaftform for building and prototyping the SuperLab.TV Advanced Learning Platforms. I discovered that retrofitting a weightlifting rack works perfectly. Currently working on communications between the SLTV Model 1 & 2 using laser transmission with an ultimate goal of creating a secure stand alone Raspberry Pi server.
Update 2.07.2014: Uploaded a new image of the Model 2. The Raspberry Pi is still performing well submerged in mineral oil.
Update 1.20.2014: The Raspberry Pi installed inside the Model 2 core has been running submerged in mineral oil for more than four weeks now with no issues. I was able to incorporate an ioBridge web gateway and temperature sensor. You can see the real time temperature readings of the mineral oil here. I have also successfully integrated two optical transceivers between the Model 1 and Model 2 platforms with optical fiber. This was a baseline test. The next step will be to remove the physical fiber connection and test communications between the platforms using a laser. The idea here is to experiment by creating a stand alone Raspberry Pi server that has no physical connections.
Update 12.07.2013: Uploaded image of Platform Model 1 mounted on a new stand and Platform Model 2 under construction. The Model 2 will have a microcontroller submerged in mineral oil and sensors to monitor and transmit temperature data.
Update 11.27.2013: Uploaded additional images to show how to combine the brake rotor base with the platform's bottom two PVC sections. I have begun construction of the second platform which will focus on communications. Once completed the two platforms will talk to each other Machine 2 Machine (M2M).
Update 11.19.2013: Added two new images of how to cut the acrylic shelves or "decks" for your platform. The Plexiglass sheets can be purchased at a hardware store and then you can use a special knife for scoring the surface. You then snap the pieces off individually. Finally I stack the shelves to keep them together and place on the drill press to drill the holes in the four corners.
Update 11.8.2013: Added link to the Arduino sketch code for the geophone. I also just uploaded a photo of what my Learning Platform looks like on my desk at work.
Update 10.28.2013: Completed integration of a Sparkfun geophone with an Arduino Uno and SD shield datalogger.
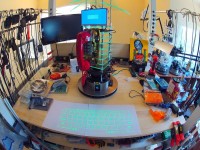
Update 10.14.2013: I was finally able to incorporate an Arduino GLCD screen onto the Learning Platform which now displays a moving graph of vibration readings received from the memsic accelerometer. I was also able to upload a photograph here which identifies the individual parts to the platform. You can also see a larger image at my website.
Update 09.27.2013.1: This latest version of the Microcontroller Learning Platform incorporates some new features. Using an Arduino Uno cell phone shield, you will now be able to control a servo motor and switch which will trigger a small vibration motor. The "off-balance" motor will create vibrations which will allow you to calibrate and test the platform's many vibration sensors.
What is an IoT Learning Platform?
When I'm experimenting with many different microcontrollers and sensors in my lab I like to have all of them available for integration and testing. The problem is, if you're like me, it doesn't take long before you find yourself with many Arduinos, Raspberry Pi's, sensors, shields and power chords all tangled together in a drawer or spread all over your work table.
This idea will show you how to build an open source/ open hardware platform that will help organize all of your microcontroller projects, sensors and shields into a well lit vertical space you can set on your desk at home or at school.
Microcontrollers and sensors used in Model 1:
- Arduino Uno (3)
- Arduino Mega (1)
- Memsic 2125 accelerometer (1)
- Arduino Uno cellphone shield (1)
- Arduino SD card datalogger shield (1)
- Sparkfun Geophone (1)
- Servo Motor (1)
- Small off-balance (vibration) motor (1)
- Trigger switch (1)
- Electric guitar pickup (1)
Source Code for Arduinos:
- Memsic accelerometer code for Arduino Uno. Go here.
- Arduino GLCD shield code for graphing vibration readings. Go here.
- Arduino Uno + cellphone shield code for triggering vibration motor. Go here. *Note that the cellphone code works with an Arduino 0022 dev environment but has not been ported to 1.0 as of yet!
- Arduino Uno + Sparkfun geophone code. Go here.
- Arduino SD card datalogger (have not uploaded yet)
What's the electric guitar pickup for?
One of the unconventional ways you can experiment with detecting seismic "strong wave" vibrations is by incorporating an electric guitar pickup. If you are not sure what an electric guitar pickup is, it is embedded just below the metal strings of an electric guitar. The pickup combines small sections of an iron rod directly below the strings. Each rod is wound up to 5000 times with a thin copper wire. When the string is struck by the musician, the vibrations of the string are picked up by the magnetic field of the pickup and then transferred to the player's amplifier and speakers. In our platform we will use the pickup to serve as a form of magnetometer. Instead of a steel string vibrating above the pickup we will incorporate a surveyor's pendulum directly above one of the six magnets. When the platform is moved or vibrates the pendulum's swinging motion will be translated into a graph using the Audacity freeware program.
- Vibrations: magnetometer, acclerometer, geophone
- Communications: Laser, WiFi, LiFi, X-Bee and Bluetooth using two Learning Platforms to communicate with each other.
- Experimental: sonoluminescence, wireless energy.
Author: Guy Cobb (SuperLab.TV)
Build This Project
Bring this design to life with the Elektor PCB Service, powered by Eurocircuits. Upload the project files and order professionally manufactured PCBs or assembled boards through a proven European production platform.
Supporting KiCad, Eagle, Gerber, and ODB++ formats, the service is suitable for everything from prototypes and validation builds to series production and volume manufacturing.
Made in Europe. Fast. Reliable. Professional.
Discussie (2 opmerking(en))