
Delta-Robot One
Smart open source robotics project for makers and students. Combines electronics, mechanics and informatics in one system.
Welcome robot friends :)
We decided to create this little robot to have an interdisciplinary subject in our studies. This project turned into a journey lasting over three years and two things always stayed the same...fun and Arduino UNO ;) Drawing, lasercutting, soldering, 3D-printing, programming an arduino library, a python package, an android and a windows app, etc....it is turning in a never ending story. With the help of a community (this means you) it could be a world wide educational project. Working on this project is a lot of fun. Learning something about the different topics and share it with the world is realy great. Be part of it...
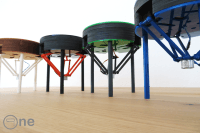
Our four One's welcome you with a short clip...
...keep smiling :)
Delta-Robot One
Delta-Robot One is mainly designed for students and makers with an educational thought. Everyone who likes to learn something about robotics can take a look at different fields - electronics, mechanics and informatics.
Let's introduce this smart little robot. His name is „One“ because he combines a lot of technical topics in one single system. This kind of robot is called delta and it belongs to the family of parallel robots.
Social Media
Instagram: @deltarobotone #deltarobotone
Facebook: Deltarobotone
Youtube: deltarobotone
Arduino Library
The arduino based system helps you to do the first steps easily. It is quite easy to start, so everyone is invited to have some time with this smart robot. If you would like to go more into detail you can do this without any problem because the software is open source.
Sourcecode: >>>One System Library<<<
Install the library using Arduino IDE librarymanager and choose OneSystemLibrary
This library comes with 20 examples to provide functions of theinterface
A full system demo (found in examples) is integrated. If you start the robot at the first time use this example to check out how Delta-Robot One works. It provides a lot of functions and you can use the robot like a stand alone system and check out the mobile and dektop application first.
If you want to use arduino code directly check out the examples. Here a short example how easy the programming interface is:
Move robot -> move.ptp(position x, position y, position z)
Python package
Delta-Robot One recieves data using a very simple structure. This structure is called the one easy protocol. Have a look at this easy protocol to understand how it works. A Python package provides this communication protocol with a high level interface to control Delta-Robot One from other systems. So you can control your robot easily from a system like a Raspberry Pi via USB. Use python package manager to install one-easy-protocol on your system:
Sourcecode, Tutorials and Documentation of One Easy Protocol:
>>>One Easy Protocol Python<<<
For C++ version of One Easy Protocol have a look at:
>>>One Easy Protocol C++<<<
Robot assembly
Delta-Robot One is designed as a Kit. The layer system of the body and a clickable mechanical solution make the assembly fast and easy. A structured circuit board makes the soldering more comfortable. Choose the colour of some parts to give the robot an individual look. All in all building the robot provides you with a short practical, educational and interesting experience. Now it‘s time to build your own One!
How to build your robot?
No worrys we created a Wiki: >>>How to build you robot<<<
Layers
>>>Documentation<<<
>>>Files<<<
How to get the layers? There are many ways...
Be creative and choose your own design to build an individual robot. Make the world of robots more colourful...
All drawings of the layer system are availible...
>>>Drawings<<<
Electronics
>>>Partlist<<<
>>>Files<<<
How to get the board? No problem...
...we uploaded our board to the aisler.com page. So you only have to follow this link and create an account to order the board for a good price.
Shop link: >>>One Circuit Board<<<
How to get the parts? All of this are standard parts...
All Schematics are availible also in a fritzing version...
>>>Schematics<<<
Mechanics
>>>Documentation<<<
>>>Files<<<
How to get the parts? No problem...
...we tested i.materialise.com and created some shop items so you can easily order the required parts using this links:
>>>Kinematics Package<<<
>>>Pillar Package<<<
All drawings of the mechanics are availible...
>>>Drawings<<<
Servo Motor
We change the servo motor from Tower Pro MG91 to MG92B because of the availibility. Adafruit Industries provide this motor and so you can easily get this part from providers like mouser, conrad and so on. The form factor is the same and the torque a little bit higher so all in all it is an advantage to use this servo motor. Thanks to Adafruit to provide this part. A few more parts of this robot are provided by Adafruit like the magnet gripper, leds and in the future it is planned to integrate the bluefruit module.
Tower Pro MG92BGear:
Metal Dimension: 22.8 x 12 x 31 mm
Torque: 3.1 kg/cm (4.8 V)
Speed: 0.13 sec / 60 degree (4.8 V)
Voltage: 4.8~6.6 V
Windows 10 Application: One Smart Control Desktop
For all those who want to control the robot from a notebook we developed an application for windows based systems. The One Smart Control application is written in C++ using the Qt-Creator IDE and Qt-Framework.
The robot has to be connected via USB. The app provides basic functions of the robot like moving, changing the light and the gripper state. A visualisation of the workingspace helps you to understand the limits of the robot.
The main advantage of this application is the integrated flowchart. It is a tool to create robot programs and start them. Save your flowcharts as flowchart files (.fc). Load and start flowcharts using One Smart Control Desktop, One Smart Control Mobile, One Easy Protocol Python, One Easy Protocol C++.
This application is based of One Easy Protocol C++ extended with signal and slots as a QObject. So it is possible to use it in your own Qt based project.
Sourcecode: One Smart Control Desktop
Download: Direct Link
Wiki: One Smart Control Desktop
Android Application: One Smart Control Mobile
For all those who want to control the robot from a mobile device we developed an application for android based systems. The One Smart Control application is written in C++ using the Qt-Creator IDE and Qt-Framework.
The robot has to be connected via Bluetooht BLE (Bluetooth module HM-10 needed). The app provides basic functions of the robot like moving, changing the light and the gripper state.
The main advantage of this application is the integrated flowchart. It is a tool to create robot programs and start them. Save your flowcharts as flowchart files (.fc). Load and start flowcharts using One Smart Control Desktop, One Smart Control Mobile, One Easy Protocol Python, One Easy Protocol C++.
This application is based of One Easy Protocol C++ extended with signals and slots as a QObject. In this version the One Easy Protocol is mapped to a Bluetooth device using a QT-Framework bluetooth BLE example. So it is possible to use it in your own Qt based project.
Sourcecode: One Smart Control Mobile
Download: Google Play Store
Wiki: One Smart Control Mobile
Grasp some metal chips with Delta-Robot One
This video clip shows a Delta-Robot One with long pillars (found at hardware_parts) and a conveyor system. This system would be shared soon in another project.
We used a system like this to grasp some chips at the image processing lab of our university. We detect the chips, the colour and the velocity. In the following video you can see a simple system with no image processing. The chip is only detected by a time of flight sensor. The motor of the conveyor system and the sensor are both connected to the robots interface. This shows the possibility to extend yout robot.
There are interfaces provided for:
Robotics
This is about the kinematics of Delta-Robot One. If you want to know something about the robot movement check out the explanations on following page:
>>>Kinematics<<<
There you get all the informations to calculate the servo angles to control a delta robot like this. No worrys this is not complicated mathematics. The main advantage of this robot is that all things we have to know are basic geometric functions.
All Images: >>>Image Data Base<<<
We decided to create this little robot to have an interdisciplinary subject in our studies. This project turned into a journey lasting over three years and two things always stayed the same...fun and Arduino UNO ;) Drawing, lasercutting, soldering, 3D-printing, programming an arduino library, a python package, an android and a windows app, etc....it is turning in a never ending story. With the help of a community (this means you) it could be a world wide educational project. Working on this project is a lot of fun. Learning something about the different topics and share it with the world is realy great. Be part of it...
Our four One's welcome you with a short clip...
...keep smiling :)
Delta-Robot One
Delta-Robot One is mainly designed for students and makers with an educational thought. Everyone who likes to learn something about robotics can take a look at different fields - electronics, mechanics and informatics.
Let's introduce this smart little robot. His name is „One“ because he combines a lot of technical topics in one single system. This kind of robot is called delta and it belongs to the family of parallel robots.
Social Media
Instagram: @deltarobotone #deltarobotone
Facebook: Deltarobotone
Youtube: deltarobotone
Arduino Library
The arduino based system helps you to do the first steps easily. It is quite easy to start, so everyone is invited to have some time with this smart robot. If you would like to go more into detail you can do this without any problem because the software is open source.
Sourcecode: >>>One System Library<<<
Install the library using Arduino IDE librarymanager and choose OneSystemLibrary
This library comes with 20 examples to provide functions of theinterface
A full system demo (found in examples) is integrated. If you start the robot at the first time use this example to check out how Delta-Robot One works. It provides a lot of functions and you can use the robot like a stand alone system and check out the mobile and dektop application first.
If you want to use arduino code directly check out the examples. Here a short example how easy the programming interface is:
Move robot -> move.ptp(position x, position y, position z)
//Create the DeltaRobotOne-Object
DeltaRobotOne robot(0, 0, 0, 0, 0, 0, 0x27);
void setup()
{
//Robot setup
robot.setup();
//Power main circuit
robot.power.mainOn();
//Move the robot to the home position (X=0.0,Y=0.0,Z=85.0)
robot.move.ptp(home);
}
void loop()
{
//Move Z-Axis up
robot.move.ptp(0.0,0.0,70.0);
//Move Z-Axis
robot.move.ptp(0.0,0.0,100.0);
//Wait for 2 seconds
robot.functions.waitFor(2000);
}
Python package
Delta-Robot One recieves data using a very simple structure. This structure is called the one easy protocol. Have a look at this easy protocol to understand how it works. A Python package provides this communication protocol with a high level interface to control Delta-Robot One from other systems. So you can control your robot easily from a system like a Raspberry Pi via USB. Use python package manager to install one-easy-protocol on your system:
#Python 2
pip install one-easy-protocol
#Python 3
pip3 install one-easy-protocol
Sourcecode, Tutorials and Documentation of One Easy Protocol:
>>>One Easy Protocol Python<<<
For C++ version of One Easy Protocol have a look at:
>>>One Easy Protocol C++<<<
Robot assembly
Delta-Robot One is designed as a Kit. The layer system of the body and a clickable mechanical solution make the assembly fast and easy. A structured circuit board makes the soldering more comfortable. Choose the colour of some parts to give the robot an individual look. All in all building the robot provides you with a short practical, educational and interesting experience. Now it‘s time to build your own One!
How to build your robot?
No worrys we created a Wiki: >>>How to build you robot<<<
Layers
>>>Documentation<<<
>>>Files<<<
How to get the layers? There are many ways...
- You can use a lasercutter in a Techshop/Makerspace or your School/University
- We ordered from cutcraft a few times so we can recommend this service
- We don't try it but with a 3D-Printer it has to be possible to create the layers too
Be creative and choose your own design to build an individual robot. Make the world of robots more colourful...
All drawings of the layer system are availible...
>>>Drawings<<<
Electronics
>>>Partlist<<<
>>>Files<<<
How to get the board? No problem...
...we uploaded our board to the aisler.com page. So you only have to follow this link and create an account to order the board for a good price.
Shop link: >>>One Circuit Board<<<
How to get the parts? All of this are standard parts...
- You can check your own maker stock first ;)
- Use the partlist on the link above and check the recommended shops
- A lot of shops and maybe your school or university have this parts availible
All Schematics are availible also in a fritzing version...
>>>Schematics<<<
Mechanics
>>>Documentation<<<
>>>Files<<<
How to get the parts? No problem...
...we tested i.materialise.com and created some shop items so you can easily order the required parts using this links:
>>>Kinematics Package<<<
>>>Pillar Package<<<
All drawings of the mechanics are availible...
>>>Drawings<<<
Servo Motor
We change the servo motor from Tower Pro MG91 to MG92B because of the availibility. Adafruit Industries provide this motor and so you can easily get this part from providers like mouser, conrad and so on. The form factor is the same and the torque a little bit higher so all in all it is an advantage to use this servo motor. Thanks to Adafruit to provide this part. A few more parts of this robot are provided by Adafruit like the magnet gripper, leds and in the future it is planned to integrate the bluefruit module.
Tower Pro MG92BGear:
Metal Dimension: 22.8 x 12 x 31 mm
Torque: 3.1 kg/cm (4.8 V)
Speed: 0.13 sec / 60 degree (4.8 V)
Voltage: 4.8~6.6 V
Robot is moving like this
Pick and place with magnet gripper
Windows 10 Application: One Smart Control Desktop
For all those who want to control the robot from a notebook we developed an application for windows based systems. The One Smart Control application is written in C++ using the Qt-Creator IDE and Qt-Framework.
The robot has to be connected via USB. The app provides basic functions of the robot like moving, changing the light and the gripper state. A visualisation of the workingspace helps you to understand the limits of the robot.
The main advantage of this application is the integrated flowchart. It is a tool to create robot programs and start them. Save your flowcharts as flowchart files (.fc). Load and start flowcharts using One Smart Control Desktop, One Smart Control Mobile, One Easy Protocol Python, One Easy Protocol C++.
This application is based of One Easy Protocol C++ extended with signal and slots as a QObject. So it is possible to use it in your own Qt based project.
Sourcecode: One Smart Control Desktop
Download: Direct Link
Wiki: One Smart Control Desktop
Android Application: One Smart Control Mobile
For all those who want to control the robot from a mobile device we developed an application for android based systems. The One Smart Control application is written in C++ using the Qt-Creator IDE and Qt-Framework.
The robot has to be connected via Bluetooht BLE (Bluetooth module HM-10 needed). The app provides basic functions of the robot like moving, changing the light and the gripper state.
The main advantage of this application is the integrated flowchart. It is a tool to create robot programs and start them. Save your flowcharts as flowchart files (.fc). Load and start flowcharts using One Smart Control Desktop, One Smart Control Mobile, One Easy Protocol Python, One Easy Protocol C++.
This application is based of One Easy Protocol C++ extended with signals and slots as a QObject. In this version the One Easy Protocol is mapped to a Bluetooth device using a QT-Framework bluetooth BLE example. So it is possible to use it in your own Qt based project.
Sourcecode: One Smart Control Mobile
Download: Google Play Store
Wiki: One Smart Control Mobile
Grasp some metal chips with Delta-Robot One
This video clip shows a Delta-Robot One with long pillars (found at hardware_parts) and a conveyor system. This system would be shared soon in another project.
We used a system like this to grasp some chips at the image processing lab of our university. We detect the chips, the colour and the velocity. In the following video you can see a simple system with no image processing. The chip is only detected by a time of flight sensor. The motor of the conveyor system and the sensor are both connected to the robots interface. This shows the possibility to extend yout robot.
There are interfaces provided for:
- Gripper/GND (ON/OFF)
- Motor/GND (PWM max. 4A)
- I2C Bus (SCL/SDA)
- Power/GND (5V/max. 4A)
Robotics
This is about the kinematics of Delta-Robot One. If you want to know something about the robot movement check out the explanations on following page:
>>>Kinematics<<<
There you get all the informations to calculate the servo angles to control a delta robot like this. No worrys this is not complicated mathematics. The main advantage of this robot is that all things we have to know are basic geometric functions.
All Images: >>>Image Data Base<<<
Discussie (0 opmerking(en))