
Doorbell 2.0
Wifi connected doorbell ... use google home as chime !
I love ESP 8266 . I'm using it in many and many projects in my house, ranging from gas detectors to light control and even vegetable irrigation and chicken door command ! .
The last one is a doorbell button.
It consist of a 4 digit OSRAM PD3535 display found in the junkbox which I choose because of the good bright ( but you can change it as you prefer even with oled type). A 5v switching regulator recovered from a car usb adapter reduce the 12vcc incoming from home to 5v needed to the display. Another regulator creates 3.3v for esp8266 and port expander. The circuit itself is quite simple: The esp8266, an I2C port expander to drive the parallel interface of the display PD3535 and the display itself.
There is also a simple temperature sensor made from an LM335 and the analog input of the esp8266 ... I added this just to see what happens in summer into the doorbell box ... in Italy the sun can be very strong at that time ... from the web page I will check approximately the circuit health... probably in north europe you can omit it !
The software:
The IP address is static to reach the built in web page simply typing the address in any browser.
An mqtt server is connected at a specified address ( 192.168.0.102 in my system) with username and password.
Two topics are required (or created if not exist) IN and RSSI.
At the first one the static number 68 is published at any doorbell press. The second topic is RSSI where the esp8266 publish node number (23 in my example) toghether with IP and RSSI of the wifi ... justy for diagnose,
The display flow the standard message continuously until the doorbell press: at that time it flash the display to gain the user attention and then begin to flow the calling message. You can change both message from the built in web page and they will be stored on eeprom. The eeprom of the esp8266 is simply a part of the system flash ... so everytime you reprogram the chip from arduino the messages will be lost , remember to reintroduce it from the web page.
The esp8266 built in led is used to diagnose wifi connection state and web server activity.
The Server side:
A mosquitto server installed in my home server dispatch the incoming messages. The system publish 2 mqtt topics : IN topic for messages from the doorbell and RSSI where it publish the wifi rssi every half an hour.
A python client (attached in the project which is an abstract from my domotic software) subscribe to IN topics and check for messages containing the number 68 . In my house codes it means doorbell ( but you can change it as you prefer !). At that point the same python script call a play to all of the google home mini located in my house sending the url of an MP3 file hosted in the same server with apache (or any other web server). You can change the filename of the mp3 file simply editing the line 31 of domot22.py .
In my home I use a slackware linux as domotic server but everything should work (ubuntu , raspberry ...) as long you have python 3 installed with the pychromecast library (pip3 install pychromecast) and a web server to serve the mp3 files to all the chromecasts.
The google home device discover is quite time consuming. To avoid unacceptable delays at the time of door bell ring action, a list of google home devices is checked and maintained every 15 minutes.
Every google home device is identified from a "friendly name" which you assign at installation time. This name is used to call devices to play. The first time you use the python software or every time you add a new google home device you must temporarily uncomment the print statement at line 18 of domot22.py . The software will display all the data of found devices from which you can grab the "friendly name" to add at line 8 of the same script. All the listed devices will play the doorbell message, a separate thread play process is created for every device.
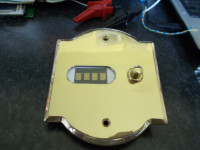
Want to build a project?
Bring your design to life with the Elektor PCB Service, powered by Eurocircuits. Upload the project files and order professionally manufactured PCBs or assembled boards through a proven European production platform.
Supporting KiCad, Eagle, Gerber, and ODB++ formats, the service is suitable for everything from prototypes and validation builds to series production and volume manufacturing.
Made in Europe. Fast. Reliable. Professional.
Discussie (0 opmerking(en))