
ESP32 thingspeak & find your network , connect and upload !
If you love to work with ESP8266 then you must fall in love of ESP32 as it’s more powerful yet less form factor. The bluetooth and wifi is inbuilt.
ESP32 thingspeak & find your network!
If you love to work with ESP8266 then you must fall in love of ESP32 as it’s more powerful yet less form factor. The bluetooth and wifi is inbuilt with ESP32. While ESP8266 appeared in 2015 the ESP32 mass production started towards the end of 2016. Now for less than a $10 you can get an ESP32 from online vendors like aliexpress.com.
However, ESP32 is still a bunch of microprocessors unlike the Raspberry Pi which is a computer. To my view if Raspberry Pi is a sort of master then ESP32 is the supreme slave or a genie ! Just put the code in it’s head and it will follow to the letter and spirit !
With ESP32 you can do many wonders with less efforts unlike in Raspberry Pi computer. It has a huge number of GPIOs for tieing with the sensors & relays. Here’s a broad difference between ESP8266 & ESP32.
Comparison between ESP8266 & ESP32:
Principle of this project:
Well, with it’s so much power lets do some worthwhile here. We will add 4 sensors to ESP32 and then upload data to thingspeak.com choosing from two WiFi Internet connections alternatively. In case the first network does not work (the site does not open or stalled) the ESP32 will reboot and then try the other connection. It will continuously keep on following this cycle. However, you can add more networks, or the pattern by which it will be tried by the ESP32 – One network in the morning , one network in the evening etc.
All the network details are to be provided in the following ways.
char ssid[] = "bera"; // your network SSID (name)
char pass[] = "**********"; // your network password
char ssid1[]= "beramobile"; // your alternate network SSID (name)
char pass1[] = "**********"; // your alternate network password
The ESP32 will try the first one, if it gets connected fine, it will continue. However, if it does not get connected, it will try the next preferred one. Once connected, the preference is recorded in the EEPROM memory of the MCU so that next time it boots, it does not require to do any experiment. It will read the EEPROM first, finds the last successful connections and connects into that.
if(counter==1) preferences.putUInt("counter", 1); //this writes into the ROM
For measuring, displaying , storing and uploading several libraries are used which can be easily installed from ‘Manage library’ facility of Arduino IDE.
#include
#include
#include
#include
#include "esp_deep_sleep.h" //This is for deep sleep
#include //This is for OLED Display
#include //This is for OLED Display
#include //This is for accessing the EEPROM
For pollution measurement we have used a general purpose sensor – TGS2600 which can detect the presence of contaminants in air like CO2, NH3, H2, Methane and LPG. The probe works on 5 Volt heater supply. Before sending the signal to ESP32 one may need to level shift it to 3.3 volt but I find it works with the ESP32 without level shifting. The reading may loose some of it’s finesse but it works. Just blow onto it and you will see the CO2 count increases so it like burn a jaws stick near it and the reading increases.
Power: Power supply for the project is taken from a 25 watt solar panel. The 12Volt supply is brought down to 5volt using a small buck charger to avoid regulation losses.
IOT with Thingspeak.com: For uploading data onto the thingspeak site one needs to create a login with a valid email id. After that create a channel , data name and then get the few important parameters like – channel id, write API key and read API key. Command like this
http://api.thingspeak.com/update?api_key=xxxxxxxxxxxxxxxx&field1=38.80
will update the field1 with the value 38.80. In the similar way these GET http commands are transferred by ESP32 to the thingspeak.com site using HTTPClient.h library file.
A gap of minimum 15 seconds is required between successive uploads on thingspeak.com which is provided in the sketch. After uploading all four fields ,it goes for deep sleep for 3 minutes. In between the modem is put to low power mode.
Schematic:
[At the time of writing , the necessary module for ESP32 is still not developed in fritzing – so the hand made drawing is used ]
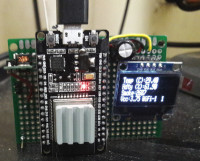
My Prototype:
BOM:
ESP32 = $8
DHT-22 = $2.5
OLED (64*32) = $3.0
TGS2600 = $3.0
Battery , capacitor, wires etc. = $5.0
Total = $21.5
[ Aliexpress.com prices ]
Power Consumption:It takes about 190 mA current during uploading but most of the power is consumed by the modem for RF output. During deep sleep it takes about 60 mA current. If the display is removed ,it will be reduced.
Last word: Unlike Arduino or ESP8266 , ESP32 is much more powerful , having more GPIOs and running at more speed. Therefore, power consumption is on the higher side but to have more reliability and stable operation ESP32 is certainly has edge over other two boards.
By bye,
Bera S
Vindhyanagar
If you love to work with ESP8266 then you must fall in love of ESP32 as it’s more powerful yet less form factor. The bluetooth and wifi is inbuilt with ESP32. While ESP8266 appeared in 2015 the ESP32 mass production started towards the end of 2016. Now for less than a $10 you can get an ESP32 from online vendors like aliexpress.com.
However, ESP32 is still a bunch of microprocessors unlike the Raspberry Pi which is a computer. To my view if Raspberry Pi is a sort of master then ESP32 is the supreme slave or a genie ! Just put the code in it’s head and it will follow to the letter and spirit !
With ESP32 you can do many wonders with less efforts unlike in Raspberry Pi computer. It has a huge number of GPIOs for tieing with the sensors & relays. Here’s a broad difference between ESP8266 & ESP32.
Comparison between ESP8266 & ESP32:
Principle of this project:
Well, with it’s so much power lets do some worthwhile here. We will add 4 sensors to ESP32 and then upload data to thingspeak.com choosing from two WiFi Internet connections alternatively. In case the first network does not work (the site does not open or stalled) the ESP32 will reboot and then try the other connection. It will continuously keep on following this cycle. However, you can add more networks, or the pattern by which it will be tried by the ESP32 – One network in the morning , one network in the evening etc.
All the network details are to be provided in the following ways.
char ssid[] = "bera"; // your network SSID (name)
char pass[] = "**********"; // your network password
char ssid1[]= "beramobile"; // your alternate network SSID (name)
char pass1[] = "**********"; // your alternate network password
The ESP32 will try the first one, if it gets connected fine, it will continue. However, if it does not get connected, it will try the next preferred one. Once connected, the preference is recorded in the EEPROM memory of the MCU so that next time it boots, it does not require to do any experiment. It will read the EEPROM first, finds the last successful connections and connects into that.
if(counter==1) preferences.putUInt("counter", 1); //this writes into the ROM
For measuring, displaying , storing and uploading several libraries are used which can be easily installed from ‘Manage library’ facility of Arduino IDE.
#include
#include
#include
#include
#include "esp_deep_sleep.h" //This is for deep sleep
#include //This is for OLED Display
#include //This is for OLED Display
#include //This is for accessing the EEPROM
For pollution measurement we have used a general purpose sensor – TGS2600 which can detect the presence of contaminants in air like CO2, NH3, H2, Methane and LPG. The probe works on 5 Volt heater supply. Before sending the signal to ESP32 one may need to level shift it to 3.3 volt but I find it works with the ESP32 without level shifting. The reading may loose some of it’s finesse but it works. Just blow onto it and you will see the CO2 count increases so it like burn a jaws stick near it and the reading increases.
Power: Power supply for the project is taken from a 25 watt solar panel. The 12Volt supply is brought down to 5volt using a small buck charger to avoid regulation losses.
IOT with Thingspeak.com: For uploading data onto the thingspeak site one needs to create a login with a valid email id. After that create a channel , data name and then get the few important parameters like – channel id, write API key and read API key. Command like this
http://api.thingspeak.com/update?api_key=xxxxxxxxxxxxxxxx&field1=38.80
will update the field1 with the value 38.80. In the similar way these GET http commands are transferred by ESP32 to the thingspeak.com site using HTTPClient.h library file.
A gap of minimum 15 seconds is required between successive uploads on thingspeak.com which is provided in the sketch. After uploading all four fields ,it goes for deep sleep for 3 minutes. In between the modem is put to low power mode.
Schematic:
[At the time of writing , the necessary module for ESP32 is still not developed in fritzing – so the hand made drawing is used ]
My Prototype:
BOM:
ESP32 = $8
DHT-22 = $2.5
OLED (64*32) = $3.0
TGS2600 = $3.0
Battery , capacitor, wires etc. = $5.0
Total = $21.5
[ Aliexpress.com prices ]
Power Consumption:It takes about 190 mA current during uploading but most of the power is consumed by the modem for RF output. During deep sleep it takes about 60 mA current. If the display is removed ,it will be reduced.
Last word: Unlike Arduino or ESP8266 , ESP32 is much more powerful , having more GPIOs and running at more speed. Therefore, power consumption is on the higher side but to have more reliability and stable operation ESP32 is certainly has edge over other two boards.
By bye,
Bera S
Vindhyanagar
Want to build a project?
Bring your design to life with the Elektor PCB Service, powered by Eurocircuits. Upload the project files and order professionally manufactured PCBs or assembled boards through a proven European production platform.
Supporting KiCad, Eagle, Gerber, and ODB++ formats, the service is suitable for everything from prototypes and validation builds to series production and volume manufacturing.
Made in Europe. Fast. Reliable. Professional.
Discussie (2 opmerking(en))