
I2C communication using NodeJS and Raspberry PI
In this article i detail how to use NodeJS language to communicate with a DS1621 temperature sensor via I2C and display the result on a web browser.
To explore the possibilities of NodeJS langage, we will use use a simple DS1621 and a Raspberry PI 0 W (W for wireless, this version of the RPI0 including WiFi and Bluetooth) as shown on the schematic given in attachements. It's a simple and well known structure, good enough to understand the way NodeJS interacts with the I2C bus and a web browser.
I used a Raspberry PI 0 W (but a Pi 3 or 4 can also be used) because it is very small and its power consumption is very low, so it can be powered by a battery pack used to recharge the phones.
It is not easy to explain simply what NodeJS is. Just know, as an introduction, that NodeJS is JavaScript executed by a server and not, as usual, by a web browser running on a client (but the browser can also execute some JavaScript code).
Thecnically speaking, NodeJS is a server-side platform built on Google Chrome's JavaScript Engine (V8 Engine).
To learn more about NodeJS, i strongly advise the reader to visit these webpages :
- In French : https://pub.phyks.me/sdz/sdz/des-applications-ultra-rapides-avec-node-js.html
- In English : https://medium.com/jspoint/introduction-to-node-js-a-beginners-guide-to-node-js-and-npm-eca9c408f9fe
- In English : https://www.simplilearn.com/tutorials/nodejs-tutorial/what-is-nodejs
The reader could also refere to these books (all of them in english) :
- NodeJS in practice by Alex Young and Marc Harter (Manning editor)
- Beginning NodeJS by Basarat Ali Sayed (Apress editor)
- The Node Beginner book by Manuel Kiessling
- Instant NodeJS Starter by pedro Teixeira (PACKT Publishing editor)
The first thing to do is to connect the Raspberry to the DS1621 sensor according to the 'schematic.jpg' file (see attachments). The sensor is mounted on a breadboard and connected to the Raspberry using 4 Dupont wires.
Then the second thing to do is to install the OS on a SD card and configure the Raspberry PI (See 'Rasperry Config.pdf' in attachments).
The simplest way to do the latter, is to use a SSH client such as 'Putty'.
We use the light and powerful. ‘raspios-buster-armhf-lite’ OS (no GUI).
Once the Rasperry PI configuration is over (WiFi, I2C, NodeJS...) , copy the files 'DS1621_V3.js' and 'DS1621_V4.html' on the raspberry and execute the '.js' script.
Don't worry, everything is explained in the 'Rasperry Config.pdf' file (see attachments).
After a few seconds, the message 'Server listen on port 8080' appears in the Linux shell.
This means the web server is OK.
Please note that this server is made by NodeJS and we don't need to install 'Apache'.
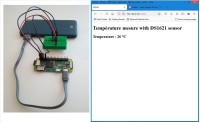
Then, on a pc or a tablet connected to WiFi, open a web browser. In the address bar type the IP address and the port of the Raspberry (e.g : 192.168.0.201:8080). A web page should appear with the message "Waiting for data...".
After 5 seconds, this message is replaced by a new message : "Temperature : XX °C" where XX is the temperature measured by the DS1621.
The measure is renewed every 5 seconds.
Note that only positive temperatures have been treated in the NodeJS script.
Although npm (the' node packages manager') offers a module named 'DS1621' (https://www.npmjs.com/package/ds1621), it seemed to me more interresting to detail the basics of the I2C communication with NodeJS, the technique here presented can be applied to others I2C devices.
Enjoy !
I used a Raspberry PI 0 W (but a Pi 3 or 4 can also be used) because it is very small and its power consumption is very low, so it can be powered by a battery pack used to recharge the phones.
It is not easy to explain simply what NodeJS is. Just know, as an introduction, that NodeJS is JavaScript executed by a server and not, as usual, by a web browser running on a client (but the browser can also execute some JavaScript code).
Thecnically speaking, NodeJS is a server-side platform built on Google Chrome's JavaScript Engine (V8 Engine).
To learn more about NodeJS, i strongly advise the reader to visit these webpages :
- In French : https://pub.phyks.me/sdz/sdz/des-applications-ultra-rapides-avec-node-js.html
- In English : https://medium.com/jspoint/introduction-to-node-js-a-beginners-guide-to-node-js-and-npm-eca9c408f9fe
- In English : https://www.simplilearn.com/tutorials/nodejs-tutorial/what-is-nodejs
The reader could also refere to these books (all of them in english) :
- NodeJS in practice by Alex Young and Marc Harter (Manning editor)
- Beginning NodeJS by Basarat Ali Sayed (Apress editor)
- The Node Beginner book by Manuel Kiessling
- Instant NodeJS Starter by pedro Teixeira (PACKT Publishing editor)
The first thing to do is to connect the Raspberry to the DS1621 sensor according to the 'schematic.jpg' file (see attachments). The sensor is mounted on a breadboard and connected to the Raspberry using 4 Dupont wires.
Then the second thing to do is to install the OS on a SD card and configure the Raspberry PI (See 'Rasperry Config.pdf' in attachments).
The simplest way to do the latter, is to use a SSH client such as 'Putty'.
We use the light and powerful. ‘raspios-buster-armhf-lite’ OS (no GUI).
Once the Rasperry PI configuration is over (WiFi, I2C, NodeJS...) , copy the files 'DS1621_V3.js' and 'DS1621_V4.html' on the raspberry and execute the '.js' script.
Don't worry, everything is explained in the 'Rasperry Config.pdf' file (see attachments).
After a few seconds, the message 'Server listen on port 8080' appears in the Linux shell.
This means the web server is OK.
Please note that this server is made by NodeJS and we don't need to install 'Apache'.
Then, on a pc or a tablet connected to WiFi, open a web browser. In the address bar type the IP address and the port of the Raspberry (e.g : 192.168.0.201:8080). A web page should appear with the message "Waiting for data...".
After 5 seconds, this message is replaced by a new message : "Temperature : XX °C" where XX is the temperature measured by the DS1621.
The measure is renewed every 5 seconds.
Note that only positive temperatures have been treated in the NodeJS script.
Although npm (the' node packages manager') offers a module named 'DS1621' (https://www.npmjs.com/package/ds1621), it seemed to me more interresting to detail the basics of the I2C communication with NodeJS, the technique here presented can be applied to others I2C devices.
Enjoy !
Want to build a project?
Bring your design to life with the Elektor PCB Service, powered by Eurocircuits. Upload the project files and order professionally manufactured PCBs or assembled boards through a proven European production platform.
Supporting KiCad, Eagle, Gerber, and ODB++ formats, the service is suitable for everything from prototypes and validation builds to series production and volume manufacturing.
Made in Europe. Fast. Reliable. Professional.
Discussie (0 opmerking(en))