
Object classification on ESP32
Creating an AI project on edgeimpulse.com is very easy and deploying the same on Micro Computer level - MCUs is easier. This project is a testimony of the same. Just sit tight & read!!!
Segregate & classify between different objects
edgeimpulse.com is the site where one should know what AI objective one wants to achieve and what are the input conditions. If these things are pretty clear then one can create an AI project on the fly. The dreadful AI jargons like training is all taken care by edgeimpulse.com site. You just relax and sit tight while edgeimpulse unfurls the output in front of your awe inspiring eyes! Some tweaking you have to do here & there which you can learn over time but the heavy loads are always lifted by edgeimpulse.com site
The brightest part of edgeimpulse.com is the deployment. You can deploy your output to many operating systems including the hardware computers like – Arduino, ESP32Camera, ESPEye, laptop pc, cell phone, python, Raspberry pi computer and more. You can create the output in the form of C++ library which can be used almost everywhere!
Well, lets do a project to understand these tall talks. Say you have a project of segregating vegetables like – lemon, onion & tomato. Or identify between objects like pen & pencil. You can add more objects but lets stick to two & three object projects now.
At the input side you have a computer like Raspberry Pi or ESP32 Camera and a few relays to segregate these vegetables to different channels. Such that, when the computer detects a tomato it will open the basket leading to Tomatoes or onions or lemons. This part is not very important as off now because if the right vegetable is detected, opening the relay, controlling the door to that vegetable collecting basket is rather easy by the GPIOs.
…
In the edgeimpulse.com create a login first which needs an email only and then lets begin for the big job. The project that we are going to create is a classification project. The computer has to see the object and then classify it properly. Once the classification is done ,the main purpose is achieved! Then we will fire up few GPIOs to do the rest of the basket filling jobs.
[However, the main project in my mind is to determine the machine floor between oil leaking floor (A) and dry normal floor (B). The machine to classify (A) and (B). If it is A it will stop the machine or otherwise]
Well, now lets open up edgeimpulse.com and create a new project. We have to collect photographs of these items [lemon, onion, tomato] or [pen & pencil] in groups & in piece from several angles and the edgeimpulse will build the project.
For collecting pictures we have several options – connect a Raspberry Pi computer and start the edgeimpulse project from inside Raspberry pi computer
1. edge-impulse-linux –disable-camera //this will start edgeimpulse project with or without raspberry pi camera2. Go to edgeimpulse.com login and start a new project.3. Notice on the right top “collect data” & below that “ Connect a device to start building your dataset.” 4. We have to collect a good amount of data of the objects from several angles in several combinations. To do that the best way is to connect a smart phone with your project now. So click the ‘ Connect a device to start building your dataset.’ Button and it will allow you to connect your mobile phone having internet. It will point to a scan picture option now. With you mobile , point to that scan now [use whatever option you have – even a google pay scan image will work ]. Follow the URL it results and your mobile will be connected.
On the left top - there are three buttons [Dataset Data-source labelling]. Press Data-source and point it to your newly connected smart phone. The smart phone is now ready for clicking pictures!
Create project: Dashboard – Devices – Data acquisition [Impulse design – create impulse – image – object detection ] So far we have now crossed the first two steps. Now you have collected a good amount of pictures of all three vegetables [lemon, onion & tomato] ,say 200 pictures. Divide them to 80:20 ratio for training & testing. For all the images you have to label them with a surrounding box. To avoid repetitive box for labelling – go to ‘labelling queue’ under ‘label suggestions’ select ‘Classify using YOLOv5’
For the beginners – in ‘create impulse’ & ‘image’ section just go with default selections. In ‘Object detection’ there are several models for classification. However, YOLO & FOMO is easier and works in the most acceptable level for object classification models. Select the model and then press it for training.
Object Detection: Grab a beer mug and sit relax. It takes sometime…
At the end of training , check for the ‘F1 score’ it should be 85% or above. To improve the score you may have to change the model or remove some of the outlier images which actually deteriorates the overall scores.
Model testing: Here comes the testing of the model. The 20% of the data which were set aside will be tested now with the above model. Just click on each image individually or do them all together. The accuracy should be well within the accepted level [81% to 91%]. However, 100% accuracy is not good for the model. In that case we have to insert some error intentionally!
Deployment of Model:
This is where most of our interest lies. The deployment can be installed on a variety of hardwares including Arduino, ESP eye, C++ ,Raspberry Pi and many more. In Raspberry Pi computer the edgeimpulse has a linux-sdk-python software with which you can run / tweak the installation far more easily. Just download the edgeimpulse model file & run the python file. Its very simple !
$python classify.py model.eim
Coming back to our model…
Select the model [Arduino ] and then press ‘Build’ button at the bottom. The Arduino sketch along with necessary library will be downloaded on your local computer.
In Arduino IDE use this zip file to install it as a new library [Sketch – Include library – Add .zip library… ]
Once that library is installed then go to file – library – find the latest library – examples – esp32 –esp32_camera – your-sketch-is-here
Uploading the sketch: The model under ESP32 is all set for ESP-EYE camera board. However, the cheap ESP32 camera that is available in the open market is “ESP32 AI Thinker cam” or little costlier “ESP32 TTGO T plus camera” board. For both these boards I have set the pin details and inserted those camera models. You have just to uncomment the right model and the sketch is all set to get installed. Light is required during identification process. The ESP AI Thinker cam has a super bright led which is set on for extra light & it helps easy detection. The uploading process takes substantial time sometimes 7 / 8 minutes. Therefore, have patience while uploading the sketch.
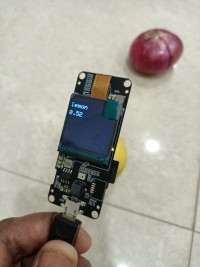
Here's output of two projects – pen-pencil-detection & vegetable-detection. The first one is on ESP32 camera board for pen-pencil-detection & the second one is on TTGO T plus camera board for vegetable-detection. Both project file is attached herewith for ready references.
Raspberry Pi deployment: edgeimpulse on Raspberry Pi is far more easier! Edgeimpulse has python-sdk which makes the task easy. Pip3 has a module named edge_impulse_linux.
$pip3 install edge_impulse_linux $git clone https://github.com/edgeimpulse/linux-sdk-python //then go to the directory and $python3 setup.py…..
$ edge-impulse-linux --disable-camera //To run without camera$ edge-impulse-linux-runner model.eim //to deploy model …Just download the model file & run the python script. So easy! More about Raspberry Pi deployment later… ESP32 Cam Schematic: The ESP32 Camera detects pen & pencil and as per pen or pencil GPIO 12 or GPIO 13 will fire up to activate the solenoid.
TTGO T-Camera Plus ESP32-DOWDQ6 8MB SPRAM OV2640 Camera Module 1.3 Inch Display With WiFi bluetooth Board - Fish-eye lens is available in amazon.in. The only difference with ESP32 Camera is it has a better camera with more RAM power. Its camera pins are already defined in the sketch. Just change the camera selection and it will be ready.
BOM:
01. ESP32 Cam : https://robu.in/product/esp32-cam-wifi-module-bluetooth-with-ov2640-camera-module-2mp/ INR:489 [$6]02. ESP32 TTGO T-Camera Plus https://robu.in/product/ttgo-t-camera-plus-camera-module-ov2640-1-3-inch-display-rear-camera-normal-rear-camera-with-mpu6050/ INR:2650 [$34]03. Solenoid / Relays [02 nos] :INR 250 [ $4]04. 0.96” I2C OLED https://robu.in/product/0-96-oled-display-module-spii2c-128x64-7-pin-blue/ INR:243 [$3]05. HT7333 / LM1117 3.3 V low drop out Regulator INR:50 [$1]06. BC547, Diode, 1K Resistor INR:160 [$2]
Total: INR:3842 [$50]
Aftermath: The project that I have done is a testimony that object classification is easy using cloud computing & can be deployed at microcomputer level even! Sorting of vegetables & segregate them to separate bins is very easy using object classification. Utility shop floor level projects like monitoring machine floor level for oily floor or dry floor can be achieved easily with little ingenuity. Such that this small inexpensive cameras can monitor the machines for any oil leakage on floor and in the event of serious situation it will raise alarm or shut down the machines using its many GPIOs.
The possibilities are many!
S.BeraNorth Karanpura
edgeimpulse.com is the site where one should know what AI objective one wants to achieve and what are the input conditions. If these things are pretty clear then one can create an AI project on the fly. The dreadful AI jargons like training is all taken care by edgeimpulse.com site. You just relax and sit tight while edgeimpulse unfurls the output in front of your awe inspiring eyes! Some tweaking you have to do here & there which you can learn over time but the heavy loads are always lifted by edgeimpulse.com site
The brightest part of edgeimpulse.com is the deployment. You can deploy your output to many operating systems including the hardware computers like – Arduino, ESP32Camera, ESPEye, laptop pc, cell phone, python, Raspberry pi computer and more. You can create the output in the form of C++ library which can be used almost everywhere!
Well, lets do a project to understand these tall talks. Say you have a project of segregating vegetables like – lemon, onion & tomato. Or identify between objects like pen & pencil. You can add more objects but lets stick to two & three object projects now.
At the input side you have a computer like Raspberry Pi or ESP32 Camera and a few relays to segregate these vegetables to different channels. Such that, when the computer detects a tomato it will open the basket leading to Tomatoes or onions or lemons. This part is not very important as off now because if the right vegetable is detected, opening the relay, controlling the door to that vegetable collecting basket is rather easy by the GPIOs.
…
In the edgeimpulse.com create a login first which needs an email only and then lets begin for the big job. The project that we are going to create is a classification project. The computer has to see the object and then classify it properly. Once the classification is done ,the main purpose is achieved! Then we will fire up few GPIOs to do the rest of the basket filling jobs.
[However, the main project in my mind is to determine the machine floor between oil leaking floor (A) and dry normal floor (B). The machine to classify (A) and (B). If it is A it will stop the machine or otherwise]
Well, now lets open up edgeimpulse.com and create a new project. We have to collect photographs of these items [lemon, onion, tomato] or [pen & pencil] in groups & in piece from several angles and the edgeimpulse will build the project.
For collecting pictures we have several options – connect a Raspberry Pi computer and start the edgeimpulse project from inside Raspberry pi computer
1. edge-impulse-linux –disable-camera //this will start edgeimpulse project with or without raspberry pi camera2. Go to edgeimpulse.com login and start a new project.3. Notice on the right top “collect data” & below that “ Connect a device to start building your dataset.” 4. We have to collect a good amount of data of the objects from several angles in several combinations. To do that the best way is to connect a smart phone with your project now. So click the ‘ Connect a device to start building your dataset.’ Button and it will allow you to connect your mobile phone having internet. It will point to a scan picture option now. With you mobile , point to that scan now [use whatever option you have – even a google pay scan image will work ]. Follow the URL it results and your mobile will be connected.
On the left top - there are three buttons [Dataset Data-source labelling]. Press Data-source and point it to your newly connected smart phone. The smart phone is now ready for clicking pictures!
Create project: Dashboard – Devices – Data acquisition [Impulse design – create impulse – image – object detection ] So far we have now crossed the first two steps. Now you have collected a good amount of pictures of all three vegetables [lemon, onion & tomato] ,say 200 pictures. Divide them to 80:20 ratio for training & testing. For all the images you have to label them with a surrounding box. To avoid repetitive box for labelling – go to ‘labelling queue’ under ‘label suggestions’ select ‘Classify using YOLOv5’
For the beginners – in ‘create impulse’ & ‘image’ section just go with default selections. In ‘Object detection’ there are several models for classification. However, YOLO & FOMO is easier and works in the most acceptable level for object classification models. Select the model and then press it for training.
Object Detection: Grab a beer mug and sit relax. It takes sometime…
At the end of training , check for the ‘F1 score’ it should be 85% or above. To improve the score you may have to change the model or remove some of the outlier images which actually deteriorates the overall scores.
Model testing: Here comes the testing of the model. The 20% of the data which were set aside will be tested now with the above model. Just click on each image individually or do them all together. The accuracy should be well within the accepted level [81% to 91%]. However, 100% accuracy is not good for the model. In that case we have to insert some error intentionally!
Deployment of Model:
This is where most of our interest lies. The deployment can be installed on a variety of hardwares including Arduino, ESP eye, C++ ,Raspberry Pi and many more. In Raspberry Pi computer the edgeimpulse has a linux-sdk-python software with which you can run / tweak the installation far more easily. Just download the edgeimpulse model file & run the python file. Its very simple !
$python classify.py model.eim
Coming back to our model…
Select the model [Arduino ] and then press ‘Build’ button at the bottom. The Arduino sketch along with necessary library will be downloaded on your local computer.
In Arduino IDE use this zip file to install it as a new library [Sketch – Include library – Add .zip library… ]
Once that library is installed then go to file – library – find the latest library – examples – esp32 –esp32_camera – your-sketch-is-here
Uploading the sketch: The model under ESP32 is all set for ESP-EYE camera board. However, the cheap ESP32 camera that is available in the open market is “ESP32 AI Thinker cam” or little costlier “ESP32 TTGO T plus camera” board. For both these boards I have set the pin details and inserted those camera models. You have just to uncomment the right model and the sketch is all set to get installed. Light is required during identification process. The ESP AI Thinker cam has a super bright led which is set on for extra light & it helps easy detection. The uploading process takes substantial time sometimes 7 / 8 minutes. Therefore, have patience while uploading the sketch.
Here's output of two projects – pen-pencil-detection & vegetable-detection. The first one is on ESP32 camera board for pen-pencil-detection & the second one is on TTGO T plus camera board for vegetable-detection. Both project file is attached herewith for ready references.
Raspberry Pi deployment: edgeimpulse on Raspberry Pi is far more easier! Edgeimpulse has python-sdk which makes the task easy. Pip3 has a module named edge_impulse_linux.
$pip3 install edge_impulse_linux $git clone https://github.com/edgeimpulse/linux-sdk-python //then go to the directory and $python3 setup.py…..
$ edge-impulse-linux --disable-camera //To run without camera$ edge-impulse-linux-runner model.eim //to deploy model …Just download the model file & run the python script. So easy! More about Raspberry Pi deployment later… ESP32 Cam Schematic: The ESP32 Camera detects pen & pencil and as per pen or pencil GPIO 12 or GPIO 13 will fire up to activate the solenoid.
TTGO T-Camera Plus ESP32-DOWDQ6 8MB SPRAM OV2640 Camera Module 1.3 Inch Display With WiFi bluetooth Board - Fish-eye lens is available in amazon.in. The only difference with ESP32 Camera is it has a better camera with more RAM power. Its camera pins are already defined in the sketch. Just change the camera selection and it will be ready.
BOM:
01. ESP32 Cam : https://robu.in/product/esp32-cam-wifi-module-bluetooth-with-ov2640-camera-module-2mp/ INR:489 [$6]02. ESP32 TTGO T-Camera Plus https://robu.in/product/ttgo-t-camera-plus-camera-module-ov2640-1-3-inch-display-rear-camera-normal-rear-camera-with-mpu6050/ INR:2650 [$34]03. Solenoid / Relays [02 nos] :INR 250 [ $4]04. 0.96” I2C OLED https://robu.in/product/0-96-oled-display-module-spii2c-128x64-7-pin-blue/ INR:243 [$3]05. HT7333 / LM1117 3.3 V low drop out Regulator INR:50 [$1]06. BC547, Diode, 1K Resistor INR:160 [$2]
Total: INR:3842 [$50]
Aftermath: The project that I have done is a testimony that object classification is easy using cloud computing & can be deployed at microcomputer level even! Sorting of vegetables & segregate them to separate bins is very easy using object classification. Utility shop floor level projects like monitoring machine floor level for oily floor or dry floor can be achieved easily with little ingenuity. Such that this small inexpensive cameras can monitor the machines for any oil leakage on floor and in the event of serious situation it will raise alarm or shut down the machines using its many GPIOs.
The possibilities are many!
S.BeraNorth Karanpura
Discussie (0 opmerking(en))