
Raspberry Pi auto DDNS forwarding
Raspberry Pi auto DDNS forwarding
Developing an webpage on Raspberry Pi is so easy and if you have a 24*7 broadband at your home then you can easily cast your webpage through the hay stock of Internet using the technique called port forwarding into your modem.
You have to tweak the settings of your modem so that it will open a fixed port which will redirect any request to that port to the Raspberry Pi web page. Most DSL modem does not forward port 8080 as it opens it's own administration page on 8080 port, so you may have to set 8081 or any other port to redirect to Raspberry Pi. However, in that case you have to set your www page on Raspberry Pi on 8081 port as well. That's not a very difficult task either. (see /etc/apache2/ports.conf )
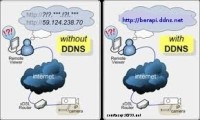
Similarly you may port forward 22 to shell connection of Raspberry Pi. In the entire process you have to know the external IP address of your modem then only you may be able to see your Raspberry Pi webpage from external world.
But to know the external IP address of your Modem you have to look into the status page of your Modem (being Intranet again !) else you may setup small PHP scripts which will check the IP address periodically and then email you to some nondescript email address (see my Raspberry Pi world web cam for more detail). Alas ! It's only between you and your Raspberry Pi computer, no one else will be able to access it.
Two years back I purchased a domain name from a third party for a penny. The domain name was valid for one year. The site also provided IP address forwarding facility for the domain name. So I used to open their site and then against the domain name I used to enter the IP address of my modem with the proper port for Raspberry Pi web page.
Having done that coupling therefore, whenever I called that domain name page from anywhere around the world ,it would open the Raspberry Pi page. But once the external IP address is changed it would no longer be valid unless I go to that site again and reforward again with the new IP address.
To make the process automatic I tried to negotiate with the site administration so that every time the IP address is changed the Raspberry Pi would shot an email to the site administrator who would re-forward the IP address again (I mean open the site and then change the IP address accordingly)
[Just to note that on a typical day my external IP address may undergo changes for as many as 10 times and that's very typical for most other ISPs]
This would make the domain name permanent for the Raspberry Pi webpage – as if it's a new webpage churning out right from your home ! On top of that since it's a site built & operated from your home it's free from any adds !
But unfortunately, that site did not have any such facility. Therefore, it was all dependent on manual intervention by me and eventually the site died it's natural death after one year.
Since then and today many things have changed ! Now there are sites available which give dynamic domain name client besides domain names. It means it gives you domain name at the same time gives you a small ddns client which will check your IP address periodically and then if there is any changes it will remake the coupling for the domain name that you have created !
Something like my case only with automatic reforwarding every time the IP address is changed !
These sites also provides free domain name with limited facilities. This project picks up the thread from here.
One such site is no-ip.com. Open the site in a browser and then create a login (it requires only a valid email address ). After log in to the site proceed to create a domain name of your choice. On free mode you can create 3 domain names of your choice but once in a month you need to re-validate those domain names else they will expire. Ofcourse they will urge you every time to go for paid mode to get rid of those inconveniences.
[Other site which provides ddns facility are]
dlinkddns.com
DynDNS.org
3322.org
freedns.afraid.org
duckdns.org
dyn.com
---
Close the site and then focus on your Raspberry Pi or any Linux computer where you have your webpage running and the port is forwarded in your Modem. Say your modem at the moment has an external IP address is 202.54.61.98 and 8081 port is forwarded to the webpage running in this computer (Raspberry Pi or any other Linux computer )
If anybody calls the page http://202.54.61.98:8081 it will open your Raspi page. Now lets proceed to create a ddns client which will take care of this auto coupling without any intervention.
Assuming that you have downloaded the noip-duc-linux.tar.gz at /home/pi.
$home/pi/> tar zxvf noip-duc-linux.tar.gz #this will expand it in /home/pi/noip-2.1.9-1/
Ensure that the network is working and the webpage is up and running
$> cd /home/pi/noip*
$home/pi/noip-2.1.9-1>make
$home/pi/noip-2.1.9-1>sudo make install
This will ask for your su password and then after installation it will ask for login email of no-ip.com site and no-ip.com password. Once they are validated it will ask for the updation duration (default is 30 minutes).
Enter that and you are done. Your Raspberry Pi website is now permanently connected to that domain name that you have created at no-ip.com.
This will also create the default configuration file at /usr/local/etc/no-ip2.conf . Some other command are as follows.
/usr/local/bin/noip2 -C configure a client
/usr/local/bin/noip2 run a client
/usr/local/bin/noip2 -S display info about running clients
/usr/local/bin/noip2 -D pid toggle the debug state for client pid
/usr/local/bin/noip2 -K pid terminate client pid
Auto start at every boot: To start noip2 at every boot put the file in the /etc/rc.local file before the exit command.
$> sudo nano /etc/rc.local
#before exit enter the following line.
sudo /usr/local/bin/noip2
exit 0;
Say, I created domain name bera.ddns.net and port 8081 is forwarded in my modem and in Raspberry Pi the noip ddns client is in operation. So everytime I call bera.ddns.net:8081 from anywhere it will open my Raspberry Pi server page. If the external IP address is changed ,in a maximum 30 minutes time it will be recoupled again by the ddns client that is running in the Raspberry Pi computer.
All the other ports that are forwarded in the Modem will be accessible against that domain name as well. Like you can ssh into Raspberry Pi like this.
$> ssh -Y pi@bera.ddns.net
Since the complete process is automated , it will make that domain name set for your website as if that domain same is meant for the web site that you have just created & linked.
Fixed IP address for Raspi: To make port forwarding easy in your Modem (In case your network reboots after a power failure ) the DHCP clients will get a new set of IP address which may derail the IP port forwarding rules in the modem. To get rid of this problem it is recommended to set fixed IP address for the webserver computer or the Raspberry Pi computer where the webpage is running.
To achieve this look into the /etc/network/interfaces file into your Raspberry Pi computer and change it according to the attached file.
***
You brag your friends & relatives that you have your personal webpage situated at
bera.ddns.net:8081 and it works.
On free mode you can create three domain names and once set all three domain names will point to your website now.
You may think for upgrade your no-ip account now.
[It may also happen that your modem has the built in facility for Dynamic DNS forwarding facility. In that case you have to open the account with the site and then enter the details in the modem administration page ]
S. Bera
Vindhyanagar
Build This Project
Bring this design to life with the Elektor PCB Service, powered by Eurocircuits. Upload the project files and order professionally manufactured PCBs or assembled boards through a proven European production platform.
Supporting KiCad, Eagle, Gerber, and ODB++ formats, the service is suitable for everything from prototypes and validation builds to series production and volume manufacturing.
Made in Europe. Fast. Reliable. Professional.
Discussie (0 opmerking(en))