
Raspberry Pi Weather recorder
Raspberry Pi weather recorder
Raspberry Pi weather recorder
Thus the idea of a real on line weather trend recorder came into my mind. The job is too complicated for an Arduino yet not very easy for a Raspi either. Getting periodic weather data from sensors some are anolog sensors which needs to be processed in an A2D converter, recording it in a database for future use and then put it on a webserver as an on line trend recorder with some stunning online graphics and other statistics is not the job of a mere microcontroller. What more ? it also uses the cellular network to send SMS to the designated recepient(s) at fixed intervals.
It's a real big boy's job.
DHT22 – the inexpensive yet very precise temperature cum humidity sensor and an LDR to measure the light ,is going to be our measurement of weather around Raspi.
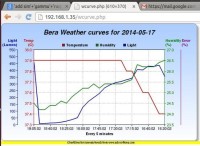
Temperature , Humudity and Light – these 3 parameters will be measured , recorded and trended on line by Raspi.
An USB GPRS modem or better still if you have an old mobile phone with data connectivity which can be used as SMS sender.
Software: (Apache2,MySql, PHP 5, Adafruit DHT Driver, ChartDirector for PHP and Gammu - for cell phone connector)
Well, I would always love to reinvent the wheel in electronics but Adafruit.com is far far ahead of me. Therefore, I just quit here and use the 'Adafruit DHT driver' for raspi for sensing the temperature and humidity. However, for plotting it on trend line I would rather love to use the ChartDirector which is very versatile in the field of Chart preparation.
$sudo apt-get update
$ sudo apt-get install apache2 php5 php5- mysql mysql-server
After successful installation of apache ,mysql and PHP , run a phpinfo() in a php file and then see whether everything has been installed or not.
$sudo nano info.php
<?php
phpinfo();
?>
save the file and then run in the browser as http://localhost/info.php or from network as http://(whatever be the IP address)/info.php. It's a big page showing all the components of PHP. Note down the version of PHP installed as it will be required while installing ChartDirector and the location of the php.ini file (usually /etc/php5/apache2/php.ini)
Version of PHP: PHP Version 5.4.4-14+deb7u8
Loaded Configuration File | /etc/php5/apache2/php.ini |
------ -------- ------------
Now lets do some time management. Set the time of Raspi as per your country timezone.
$sudo raspi-config
Go to Internationalization and set date to your country. For IST select Asia and then Kolkata.
ChartDirector:
Now come to the big job of ChartDirector installation. First download the ChartDirector software from the following location of google drive.
https://drive.google.com/file/d/0B3E3LcSKoM-6eUQ0SUNMdmw0QVU/edit?usp=sharing
[Till couple of months back the ChartDirector for Arm processor or the Raspberry Pi computer was not available but ever since it has been made available at the advsofteng.com site there is mixed feelings. Some could successfully integrate it with LAMP stack on Raspberry Pi while many could not. I carefully read it and then could install it in one go ! Now if you follow all the steps that I'm going to narate, you too will be able to install it every time and then can impress your viewers with instant and rich magics of ChartDirectors. ]
Extract the repository in /var/www/
$cd /var/www/
$ sudo tar zxvf *.gz
The software will be extracted in default directory (var/www/ChartDirector) . Go to that directory and copy the entire content of /lib directory into your /usr/lib/php5/20090626+lfs/ directory
$cd /var/www/ChartDirector/lib
$sudo cp -fr * /usr/lib/php5/20090626+lfs/
$sudo cp -fr *.* /usr/lib/php5/20090626+lfs/
Thus all the files including the fonts directory will be copied into the /usr/lib/php5/20090626+lfs/ directory.
[in fact only the fonts directory and one more file is needed but to make the job easy I propose to copy all the files ]
OK, now only one more step is left to make the ChartDirector works on Raspberry Pi computer. Only one step left from the magic world of chart making !
$sudo nano /etc/php5/apache2/php.ini
Go to the middle portion where the mysql.so extension is written. (search mysql.so )
and then make a space somewhere below it and write
extension=phpchartdir540.dll //since your PHP version is 5.4.4
[if the PHP version is 5.5 then we had to include phpchartdir550.dll ]
Save the file and restart apache2.
$sudo /etc/init.d/apache2 restart
Run the info.php file now. http://localhost/info.php and look out for ChartDirector somewhere there. And you find something like this ...
Version | 5.0 |
Congratulations ! You have successfully installed ChartDirector onto your Raspberry Pi computer now. Creating the magical charts is only a few clicks away !!!
Go to network and then open the following location.
http://(whatever IP address of Raspi)/ChartDirector/phpdemo/
and you will find plenty of different kinds of charts ready for deployment in PHP. See the different charts , play with them and then see their codes ! So easy just supply your data and the charts will be created on the fly ! Programs like ChartDirector makes the programming easy and very interesting !
For on line display of temperature, humidity and light data we will pick the multi Y - axis chart. We will design a crond task to sense data and then dump it in a MySql database. The chart will access the database every few minutes, take out data and then create the trend line live....
But that comes in the 2nd part
[end of Raspberry Pi Recorder ,part-1 ]
Raspberry Pi Recorder, Part -2 ....
SMS sender: I have a old dlink data card DMW – 456. I insert it in the USB port of Raspberry Pi computer and the Raspi detects it at /dev/ttyUSB0 & /dev/ttyUSB1 (one for the 3G modem and the other one is for the microsd card that comes inbult with the datacard). Alternatively you may have an old mobile (Nokia or FLY ) which could connect through USB cable and once connected you find it is detected at /dev/ttyACM0.
Therefore, our 3G modem is detected at
/dev/ttyUSB0 ----- - dlink datacard
/dev/ttyACM0 ------- old mobile phone.
$sudo apt-get install gammu gammu-smsd
[Gammu is the most powerful commandline based SMS software. Using gammu one can send SMS silently yet very precisely. But first we have to configure gammu for right devices.
$sudo gammu-config
Set the right usb port for the modem / datacard or the mobile phone. Save it and then exit. The configuration file will be written at /root/.gammurc . Copy this file to /etc/gammurc so that everytime Gammu runs , it finds the default configuration file.
$sudo cp /root/.gammurc /etc/gammurc
Database:
Create a MySql database – weather and a table under it – temp , using command line or phpmyadmin. This will store the data with the following fields, sl (integer), date (date), time (varchar 12), temp (varchar 6),hum (varchar 6),light (varchar 4). The sl field will be unique and auto_increasing (see pic).
Software:
We have one main weathergsm.php, which collects data from light probe (LDR), temperature and Humidity data from DHT22 probe using MCP3008 AtoD converter and Adafruit DHT driver respectively. You have to enable SPI bus in Raspberry Pi for that.
The weathergsm.php after collecting these data dumps in the database with time stamping and then send an SMS to the designated number(s) defined in the script.
To repeat the job at every 5 minutes we put the file in cornd task list.
$sudo crontab -e #go to the end and write the following
*/5 * * * * sudo php -f /var/www/weathergsm.php
save crontab by ctrl+o and then restart cron job by
$sudo /etc/init.d/cron restart
MySql database:
Once data is available in database, it's a no difficulty to process it and display. However, with ChartDirector there's an added advantage of displaying it with greater transparency and creativity. We've created two users for exploiting the weather database.
User 'weather' with password 'weather123' is for inserting into the database.
User 'webuser' with no password is for viewing the wcurve.php.
[For creation of mysql user, look into phpmyadmin ]
Browser output
figure-1.jpg
adcwrite.py – the python
This is for A2D conversion of analog data from MCP3008. It has total 8 channel 10 bit data input facility. We are using only 1 channel here for measuring the ambient light intensity. Another 7 analog devices can be connected to it – like an anemometer for measuring air speed , some analog device to measure air direction etc. The python script takes the data and then over write a text file with time stamp. The PHP script weathergsm.php later reads the file ,takes out data and dumps in the datababse.
Adafruit_DHT – the C driver.
It's the Adafruit DHT driver for running the AM2302 temperature & humidity probe ,reads data and then over writes on a text file. The same PHP script ,weathergsm.php later reads this file, takes out data and dumps in the database.
Weathergsm.php – the PHP
It's the master PHP program which runs once in 5 minutes by a crond task manager and pulls data from different text files to finally dumps into the database file. The python and the c program is called in PHP by shell_exec command like this ...
shell_exec('sudo Adafruit_DHT 2302 4 > /var/www/temp.txt');
shell_exec('sudo python /home/pi/spi/adcwrite.py');
[Following block sends data using cellular network to my Cellphone ]
$datastring=$dt.",".$tm.",".$temp.",".$hum.",".$light[2];
shell_exec("sudo echo '$datastring' | gammu --sendsms text +919406711862");
It's a complete merging of C , Python and PHP together in one project.
All the above softwares are available at this location :
https://drive.google.com/file/d/0B3E3LcSKoM-6N0drMEdmYzRocms/edit?usp=sharing
The schematic of connections:
The schematic is shown below. Only one channel of 8 A2D channels of MCP3008 is used by the LDR. 7 more Analog devices can still be connected to it. The AM2302 – the Temperature cum Humidity probe has 4 wires out of which wire no-3 is not connected. The wire-2 the data out wire goes to pin no 7 of Raspberry Pi computer. The MCP3008 is connected on SPI bus of Raspberry Pi computer. One has to enable SPI for this. Read detail in my other project on MCP3008.
[schematic ]
figure-2.jpg
S. Bera
Vindhyanagar
Build This Project
Bring this design to life with the Elektor PCB Service, powered by Eurocircuits. Upload the project files and order professionally manufactured PCBs or assembled boards through a proven European production platform.
Supporting KiCad, Eagle, Gerber, and ODB++ formats, the service is suitable for everything from prototypes and validation builds to series production and volume manufacturing.
Made in Europe. Fast. Reliable. Professional.
Discussie (1 opmerking(en))