
Traffic Signal Control with Arduino Nano
Have you ever found yourself stuck in traffic, wishing the lights would change faster? Or have you ever noticed that the traffic lights in your area seem poorly timed, causing frustrating backups and delays?
Have you ever found yourself stuck in traffic, wishing the lights would change faster? Or have you ever noticed that the traffic lights in your area seem poorly timed, causing frustrating backups and delays? Imagine being able to take control of the traffic signals yourself and creating a more efficient and less congested traffic flow.
With the power of technology and the Arduino Nano microcontroller, that's exactly what you can do. In this project, we will explore how to build and program a traffic signal control system using Arduino Nano, allowing you to take charge of traffic flow and make your daily commute smoother and more enjoyable. So buckle up, and let's dive into traffic signal control with Arduino Nano!
How Arduino Nano can be used in Traffic Signal Control?
Traffic signals are an essential component of modern urban infrastructure. They help regulate the flow of traffic, ensuring the safety of both pedestrians and motorists. The Arduino Nano is a small microcontroller that can be used in traffic signal control to make the process more efficient and effective. In addition, the Arduino Nano is a cost-effective solution that can be easily integrated into traffic control systems. Here are some ways the Arduino Nano can be used in traffic signal control.
The Arduino Nano can be used in traffic signal control by creating a smart traffic light system. Smart traffic lights use sensors to detect the presence of vehicles and adjust the traffic signal accordingly. By using an Arduino Nano, sensors can be easily connected and programmed to detect the presence of vehicles. This information can then be used to adjust the traffic signal, reducing wait times and congestion.
Another way the Arduino Nano can be used in traffic signal control is by creating a system that allows emergency vehicles to pass through intersections quickly and safely. Using an Arduino Nano, sensors can be installed at intersections that detect the presence of emergency vehicles. When an emergency vehicle is detected, the traffic signal can be adjusted to allow the emergency vehicle to pass through the intersection safely and quickly.
In addition to improving traffic flow, the Arduino Nano can improve intersections' safety. Using sensors and cameras; the Arduino Nano can detect unsafe driving behaviors such as running red lights or speeding. When these behaviors are detected, the traffic signal can be adjusted to prevent accidents and improve safety.
Benefits of Traffic Signal Control with Arduino Nano
Components Required for Traffic Signal Control with Arduino Nano
To set up a traffic signal control system with Arduino Nano, you will need the following components:
Arduino Nano
Arduino Nano is a compact and versatile development board based on the popular ATmega328 microcontroller. It is a small, breadboard-friendly board that can be used for various electronic projects. The board has a similar functionality to the Arduino UNO board but with a smaller form factor and lower power consumption.
The Nano board has 14 digital input/output pins, 8 analog input pins, and a 16 MHz quartz crystal oscillator. It also includes a USB interface for easy programming and communication with a computer. Additionally, it can be powered by a USB connection or an external power source.
The Arduino Nano is ideal for small and medium-sized projects that require a compact, low-power microcontroller. In addition, it can be used for a wide range of applications such as robotics, automation, sensors, and data acquisition.
Breadboard
A breadboard is a reusable circuit board that allows you to prototype and test electronic circuits without soldering quickly. It consists of a grid of holes connected by conductive metal strips.
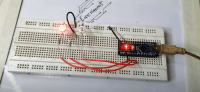
In a Traffic Signal Control project with an Arduino Nano, the breadboard can connect various electronic components such as LEDs, resistors, capacitors, and wires. The Arduino Nano is connected to the breadboard using male-to-male jumper wires. The breadboard provides a convenient way to connect these components without having to solder them together, making it easy to modify and test the circuit.
For example, the breadboard can connect the LEDs for the traffic signals, resistors to limit the current to the LEDs, and wires to connect everything together. Using a breadboard, you can quickly experiment with different resistor values and LED configurations to find the optimal combination for your project.
Sensors
In the Traffic Signal Control with Arduino Nano project, sensors detect vehicles' presence or absence at an intersection. These sensors provide information to the Arduino Nano microcontroller, which uses this data to control the traffic signal timings.
Several types of sensors can be used for this project, including:
Steps to Set Up Traffic Signal Control with Arduino Nano
Conclusion
Traffic Signal Control with Arduino Nano is an innovative solution to traffic congestion. It can help improve traffic flow, reduce delays, and provide a cost-effective solution for traffic management. Using the right sensors and programming, traffic signal control with Arduino Nano can be customized to suit different traffic conditions, making it a flexible and user-friendly solution. With its low cost and ease of use, Arduino Nano is an excellent choice for traffic signal control projects.
With the power of technology and the Arduino Nano microcontroller, that's exactly what you can do. In this project, we will explore how to build and program a traffic signal control system using Arduino Nano, allowing you to take charge of traffic flow and make your daily commute smoother and more enjoyable. So buckle up, and let's dive into traffic signal control with Arduino Nano!
How Arduino Nano can be used in Traffic Signal Control?
Traffic signals are an essential component of modern urban infrastructure. They help regulate the flow of traffic, ensuring the safety of both pedestrians and motorists. The Arduino Nano is a small microcontroller that can be used in traffic signal control to make the process more efficient and effective. In addition, the Arduino Nano is a cost-effective solution that can be easily integrated into traffic control systems. Here are some ways the Arduino Nano can be used in traffic signal control.
The Arduino Nano can be used in traffic signal control by creating a smart traffic light system. Smart traffic lights use sensors to detect the presence of vehicles and adjust the traffic signal accordingly. By using an Arduino Nano, sensors can be easily connected and programmed to detect the presence of vehicles. This information can then be used to adjust the traffic signal, reducing wait times and congestion.
Another way the Arduino Nano can be used in traffic signal control is by creating a system that allows emergency vehicles to pass through intersections quickly and safely. Using an Arduino Nano, sensors can be installed at intersections that detect the presence of emergency vehicles. When an emergency vehicle is detected, the traffic signal can be adjusted to allow the emergency vehicle to pass through the intersection safely and quickly.
In addition to improving traffic flow, the Arduino Nano can improve intersections' safety. Using sensors and cameras; the Arduino Nano can detect unsafe driving behaviors such as running red lights or speeding. When these behaviors are detected, the traffic signal can be adjusted to prevent accidents and improve safety.
Benefits of Traffic Signal Control with Arduino Nano
- Traffic signal control with Arduino Nano can help improve traffic flow by reducing congestion and minimizing delays.
- Arduino Nano is a low-cost microcontroller board, making it an affordable solution for traffic signal control.
- Arduino Nano is a versatile microcontroller board that can be programmed to work with different sensors, making it adaptable to various traffic conditions.
- Arduino Nano is easy to use, and programming requires only basic knowledge of programming languages such as C++.
Components Required for Traffic Signal Control with Arduino Nano
To set up a traffic signal control system with Arduino Nano, you will need the following components:
- Arduino Nano Board
- Traffic Signal Lights (Red, Yellow, Green)
- Sensors
- Breadboard
- Jumper Wires
- Power Supply
Arduino Nano
Arduino Nano is a compact and versatile development board based on the popular ATmega328 microcontroller. It is a small, breadboard-friendly board that can be used for various electronic projects. The board has a similar functionality to the Arduino UNO board but with a smaller form factor and lower power consumption.
The Nano board has 14 digital input/output pins, 8 analog input pins, and a 16 MHz quartz crystal oscillator. It also includes a USB interface for easy programming and communication with a computer. Additionally, it can be powered by a USB connection or an external power source.
The Arduino Nano is ideal for small and medium-sized projects that require a compact, low-power microcontroller. In addition, it can be used for a wide range of applications such as robotics, automation, sensors, and data acquisition.
Breadboard
A breadboard is a reusable circuit board that allows you to prototype and test electronic circuits without soldering quickly. It consists of a grid of holes connected by conductive metal strips.
In a Traffic Signal Control project with an Arduino Nano, the breadboard can connect various electronic components such as LEDs, resistors, capacitors, and wires. The Arduino Nano is connected to the breadboard using male-to-male jumper wires. The breadboard provides a convenient way to connect these components without having to solder them together, making it easy to modify and test the circuit.
For example, the breadboard can connect the LEDs for the traffic signals, resistors to limit the current to the LEDs, and wires to connect everything together. Using a breadboard, you can quickly experiment with different resistor values and LED configurations to find the optimal combination for your project.
Sensors
In the Traffic Signal Control with Arduino Nano project, sensors detect vehicles' presence or absence at an intersection. These sensors provide information to the Arduino Nano microcontroller, which uses this data to control the traffic signal timings.
Several types of sensors can be used for this project, including:
- Infrared sensors: These sensors detect the heat signatures of vehicles passing over them. They are often used with a transmitter and receiver to detect the interruption of the infrared beam by a passing vehicle.
- Ultrasonic sensors: These sensors use high-frequency sound waves to detect the distance to objects in front of them. They can be used to detect the presence of vehicles in a lane or at an intersection.
- Magnetic sensors: These sensors detect the presence of magnetic fields, which are generated by the metal components of vehicles. They are often used in conjunction with loops of wire embedded in the road surface to detect the presence of vehicles.
Steps to Set Up Traffic Signal Control with Arduino Nano
- Connect the Traffic Signal Lights to the Arduino Nano Board
- Connect the Sensors to the Arduino Nano Board
- Write the code to interface the Sensors with the Traffic Signal Lights
- Upload the Code to the Arduino Nano Board
- Test the System
Conclusion
Traffic Signal Control with Arduino Nano is an innovative solution to traffic congestion. It can help improve traffic flow, reduce delays, and provide a cost-effective solution for traffic management. Using the right sensors and programming, traffic signal control with Arduino Nano can be customized to suit different traffic conditions, making it a flexible and user-friendly solution. With its low cost and ease of use, Arduino Nano is an excellent choice for traffic signal control projects.
Discussie (0 opmerking(en))