
Brettmonster
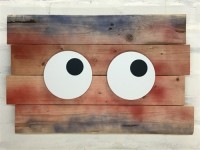
This object inspires the whole family. Not least because the board- monster looks very lively thanks to its electrical and programmable eye drive.
How I built my “Brettmonster” (board-monster)
Woodwork
I cut 4 boards out of the wood of an old pallet. The boards are each 56 cm long, 9.5 cm wide and 1.5 cm thick. Because the character of raw wood should be preserved, they have only been plane down and sanded a little. Then I connected them together by unscrewing two strips from behind. After the cutouts for the eye drives were finished, the whole thing was lightly colored from the front with red and blue paint spray.Eyes
First I cut out circles with a diameter of 15 cm from a 3mm thick PVC foam sheet with a scalpel. I would have preferred a 2mm thick plate because of its lower mass. Unfortunately, it wasn't in our hardware store. Then the lathe was misused to cut the bottoms out of peanut cans. Two 1cm long pieces of a 10mm thick brass rod have been given a 5mm hole lengthways to fit the motor shaft. Then a 2mm hole from the side so that a 2.5mm thread can be cut. The eye is then later attached to the motor shaft with a cylinder screw M 2.5. If you have, you can of course also use a suitable grub screw. You can also save yourself the work and use matching brass collars. Now the parts are soldered as centrally as possible onto the sheet metal disks (the bottom of the peanut jar). On the other hand, the sheet metal disks are provided with a double-sided adhesive film and thus glued to the PVC foam sheet circles (also in the middle). To be on the safe side, I stuck some self-adhesive film over it. At the end then the black circles, which are also made of self-adhesive film, stick on from the front. The black circles are 5.4 cm in diameter. If you shy away from the trouble of cutting out the circles, just take the appropriate ones. Planter coasters, lids for biscuits or paint jars, lids for Tupperware jars, Frisbee discs or throwing discs, to name just a few alternatives. In addition to the optics, it is only important that the motors used can accelerate and stop the mass. Step losses can occur when using stepper motors. If, on the other hand, you use servo motors from model construction, the gearbox, which is often built with plastic gears, could possibly suffer damage.Eye drives
I use stepper motors where the shaft protrudes at least so far on the back that the construction with the flag, the one that interrupts the light path of the fork light barrier, can still be securely attached. It must be mentioned that the only purpose of the light barriers is to enable a defined initial position of the eyes during commissioning, i.e. after a de-energized state. That means if someone can do without it because he does it every time by hand, the construction of the drives can be simplified enormously.Electronic control
My control electronics are completely self-built and adapted to the stepper motors used. The whole thing becomes much easier if finished electronic modules are used that only have to be plugged together correctly. An Arduino microcontroller board and fully assembled stepper motor driver would be ideal. There are countless descriptions and tutorials on this topic. It is also an advantage that a USB cable and the free Arduino programming software are sufficient for programming.Want to build a project?
Bring your design to life with the Elektor PCB Service, powered by Eurocircuits. Upload the project files and order professionally manufactured PCBs or assembled boards through a proven European production platform.
Supporting KiCad, Eagle, Gerber, and ODB++ formats, the service is suitable for everything from prototypes and validation builds to series production and volume manufacturing.
Made in Europe. Fast. Reliable. Professional.
Discussie (1 opmerking(en))