
Raspberry Pi zero speech functions
Raspberry Pi zero is the best of both worlds - MCUs like Arduino, ESP32, Maixduino at one side and Single board computer on the other side. Having the small form factor with good number of GPIOs Pi-zero gives the best. AI models which are just unthinkable for MCUs runs like a charm on Pi zero. Speech functions adds more flavour to it !!!
TTS: Couple of years back I purchased a small Chinese speech MCU model which claimed to work on text to speech conversion. It claimed to work with any normal MCU like Arduino or ESP32. After that for many days & nights I cracked my head to make it work and finally one day It really talked only to frustrate me further! It worked with Arduino & ESP32. It also worked with micro python language. It works with English language but instead of pronouncing the words thereby, speaking the sentences, it only pronounces the letters like letters - l e t t e r s My name : SOMNATH - S O M N A T HBy the time you heard the last letter the first letter goes off far away to recall & reconstruct the whole word phonetically! It was an utter nonsense module on which I wasted my time!
eSpeak / eSpeak-ng: ‘ESpeak new generation’ is a full blown & matured Open Source software available for Linux based Debian OS. It is also available for Mac systems [Try in App Store] The ‘espeak’ and latest version ‘espeak-ng’ both gets installed very easily and the fun begins instantly! I have used ‘espeak’ in my many edge-impulse projects where after detection the device speaks up the classification output on the attached speaker! IT can even speak up a whole text file supplied in the argument section.$> espeak-ng -f temp.txt or $> espeak-ng “Hello Readers, welcome to this project”Besides English Espeak-ng can speak a number of languages. $> espeak-ng -v en+f2 “Input text" [for female voice]$> man espeak-ng [will give you detail glimpse of the manuals]
To install eSpeak-ng on Pi Zero just do the following. It’s very easy.$> sudo apt-get install espeak-ng
Sound output on Pi Zero: There is no sound output on Pi-Zero board. To have sound output one has to connect an HDMI device [in other words a TV] on Pi-Zero and the sound will come out in normal way. However there are HDMI-to-AV output devices which can be used to separate out the audio-only output. However, there are another way which can be shown here. Any two of GPIO 12,13,18,19 pins can be used to force audio output by adding just one line in /boot/config.txt file. dtoverlay=audremap,pins_18_13
$> sudo nano /boot/config.txt open this file, add that line & reboot. You are ready for beautiful stereo output through this schematic. The PAM8403 is available for INR:50 [less than $1 from robu.in]
Once speak or espeak-ng is installed then just writing the string in front of espeak-ng, the whole line will be spoken by espeak-ng.$> espeak-ng “hello Bera how are you?”However, see the manual of espeak-ng to change the speech parameters like male / female voice, high pitched or husky, amplitude at 50 or 100, language etc.
Voice-in to Pi-zero: So far voice out is perfect. To have voice-in I tried a cheap yet very precise I2S microphone - INMP441 but believe me despite spending many hours behind it, I failed to make it talk with Pi-zero. Finally I settled with a cheap USB microphone - from robu.in for lNR 169 [$2] and the beautiful thing is that it just works out-of-the box. Once inserted into the only USB port of Pi-zero, do an ‘lsusb’ to find out the hardware device number. You may need to have an OTG cable to interface between micro USB [Pi-zero side] to USB [mic]. Now to see that the mic is fully functional ,try this one on a terminal - $> arecord -f S16_LE -r 33100 -d 10 -c 1 output.wav
- -f S16_LE: Specifies the audio format. S16_LE stands for signed 16-bit little-endian.
- -r 33100: Sets the sample rate to 33100 Hz.
- -d 10: Specifies the duration of the recording in seconds (e.g., 10 seconds in this example).
- -c 1: Sets the number of audio channels to 1 (mono). Adjust as needed for stereo recordings (-c 2 for stereo).
- output.wav: Specifies the output file name (output.wav in this example).
$> lsusb output …
Bus 001 Device 002: ID 4c4a:4155 Jieli Technology UACDemoV1.0Bus 001 Device 001: ID 1d6b:0002 Linux Foundation 2.0 root hub
To play the audio file $> aplay output.wav , will play your invaluable 10 seconds acoustic creation. Adjust the mike suitably to get clear audio recordings.
Well, so far so good. You have set up your audio source, you have installed the text-to-speech program on Pi-zero and also have successfully tried both audio recording and converting text to speech using eSpeak or eSpeak-ng. Now lets come speech-to-text conversion. The google has a paid service of speech-to-text conversion which requires internet connections besides the speech-to-text software itself. The google also has online text-to-speech software as well which gives you free conversion for a few characters [200 words]. For more you need to buy their account. However, here on Pi Zero we will try with an offline speech-to-text software which works fairly well for clear speeches.
Speech-to-text software:There are two great OSS softwares available on Internet - spchcat & pocketsphinxWhile spchcat is a command line software the pocket sphinx is a library based software. Both softwares can be called within python using different techniques. While subprocess is used for calling ‘spchcat’ , pip module of pocketsphinx can be called directly from within python. The installation process of these two great softwares is narrated below.
1. Spchcat: Spchcat is an OSS uses Tensorflow recognition model. Supports 46 language models including Indian languages - Tamil & Bengali.Software Source:https://github.com/petewarden/spchcathttps://github.com/petewarden/spchcat/releases/download/v0.0.2-rpi-alpha/spchcat_0.0-2_armhf.deb
The speechcat software is a command line software which reads directly from wav files. Through system voice transfer, it can read from mp3 files too. It means at one side you play mp3 file and at the same time you decipher it using spchcat software. Lets see how. The GitHub location of the Linux [Debian] software has been indicated above. Download it on your computer first and then using scp [shell copy] transfer it on your Pi-zero sdcard. The size of the file is about 1.2 GB. Ordinarily this will not install on Pi-zero for sure. Therefore, take the sdcard to a Raspberry Pi B+ or 4 and then double click the downloaded software. It will install on Raspberry Pi 4 in about 25 minutes. Take the Sdcard to you Pi-zero and it will work there. That’s the trick to cheat a Pi-zero!$> spchcat
Usage: After installation, you should be able to run it with no arguments to start capturing audio from the default microphone source, with the results output to the terminal:
spchcat
System Audio: If you don't have a microphone attached, or want to transcribe audio coming from another program, you can set the --source argument to 'system'. This will attempt to listen to the audio that your machine is playing, including any videos or songs, and transcribe any speech found.
spchcat —source=system
Running wav files: spchcat audio/8455-210777-0068.wav
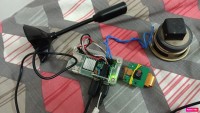
Language support: $> spchcat —language=de_DE $> spchcat —language=en_US Total 46 language supports available including two Indian languages - Bengali & Tamil. This software is currently supported by two platforms - Linux & Raspberry Pi. Since spchcat is a very resource hungry program, it profusely heats up the CPU, therefore, keeping a tap on the CPU temperature is very important also need not to tell you that you need to put a very good quality heatsink on the Pi-zero CPU chip [see my picture].
Sample WAV file: https://github.com/coqui-ai/STT/releases/download/v1.1.0/audio-1.1.0.tar.gz This is the location where you can download the sample wav files to test with spchcat. Just listen to this wav files to understand the quality of the wav files required to get a clear transcription. Use these files as transcription creations on your Pi-zero.
Saving output to text file: spchcat your-audio-file.wav > /tmp/transcript.txt
Python program: Since spchcat is a command line program, to invoke it within python you have to import subprocess at the beginning of the python script. In case you do not have it in your python [3.7 or above] just install it by - $> pip install subprocess $> vcgencmd measure_temp [this command measures CPU temperature] $> arecord -f S16_LE -r 33100 -d 10 -c 1 mike4.wav [to record voice at 33100 Hz and mike4.wav file] [ Example file mike4.py attached ]
2. Pocketsphinx: It’s a Carnegie Melon University Open Source lightweight speech recognition engine. It reads single-channel 16-bit PCM audio from standard input or one or more files, and attempt to recognise speech using the default acoustic and language model. Unlike complex spchcat it’s a lighter model!
Software: Installation is very straight forward. These two commands will do all. $> pip install pocketsphinx $>sudo apt-get install -y python3-pocketsphinx pocketsphinx-en-us
Usage / Python program: Inside python the pip module LiveSpeech is called and then for the LiveSpeech() loop each phrase [read words] are print on the console. [live1.py attached] Attach an USB mike and point the mike towards the sound source to transcribe. Please mind the sound quality which matters most.
Language Support: Except English it has language support for Chinese, French, Spanish, German and Russian. However I have not bothered to try any other languages. It can directly convert wav file to transcript but it is very slow, of course using python only. [live_file.py attached]
Observations: For spchcat it works upto 4 minutes for recording & transcription of wav files on Pi-zero but on Raspberry Pi-4 it can record non-stop live transmission of YouTube videos. The recording quality is very vital for this project. Normally a close placement of the microphone solves the problem. For pocketsphinx the live transmission works for both Pi-zero and Pi-4. On Pi-zero it looses words frequently while on Pi-4 it works like a charm. The transcription quality of spchcat is better than pocketsphinx.
Project Ideas: Some of the cherished project ideas that I am working now with this new capability of Pi-zero is as follows.
01. Voice interactive chatgpt terminal - It will be a completely hands free speaking terminal where you speak, you confirm and the Pi-zero brings answers from chatgpt and then speaks out for you.
02. Live transcription of speeches - It will be an online live speech-to-text transcription.
03. A blind man’s terminal where the man speaks the questions and the Raspberry-Pi brings out answers searching many websites. Openai could be one of them but not all!
Bye bye
Want to build a project?
Bring your design to life with the Elektor PCB Service, powered by Eurocircuits. Upload the project files and order professionally manufactured PCBs or assembled boards through a proven European production platform.
Supporting KiCad, Eagle, Gerber, and ODB++ formats, the service is suitable for everything from prototypes and validation builds to series production and volume manufacturing.
Made in Europe. Fast. Reliable. Professional.
Discussie (1 opmerking(en))