Elektronica-werkplek: laat zien waar u ontwerpt en programmeert!
15 april 2020
op
op

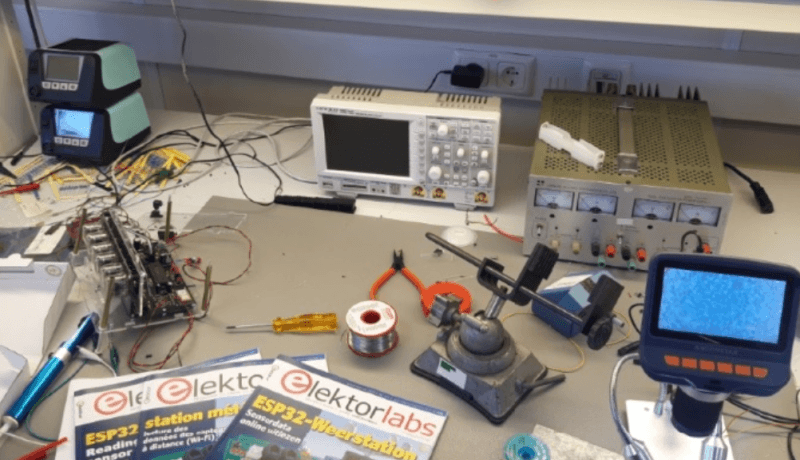
Enkele engineers, redacteuren en managers van Elektor hebben onlangs iets laten zien van hun home office en elektronica-werkplek. U kon zien waar ze aan projecten werken, nieuws-items schrijven, boeken en tijdschriften redigeren en nieuwe producten en activiteiten van Elektor plannen. Nu bent u aan de beurt – laat de wereldwijde elektronica-community zien waar u werkt!
Of u nu een professional bent of een student of een hobbyist – wij zijn geïnteresseerd in uw eigen elektronica-lab of werkplek. Het doet er niet toe of u een superdeluxe lab hebt met peperdure apparatuur, of dat u het moet stellen met een tafel plus soldeerbout in een hoekje van de zolder – we horen graag van u!
Wilt u uw werkplek met ons delen? Bezoek de (Engelstalige) Workspace Submission-pagina, waar u ons foto’s en opmerkingen kunt sturen over die speciale plek waar u uw projecten ontwerpt en systemen programmeert.
De redactie van Elektor beoordeelt de inzendigen en kiest de meest opmerkelijke voor publicatie op onze websites en in onze tijdschriften,zoals Elektor, MagPi (Nederlands en Frans) en Make: (Nederlands). Als uw inzending wordt geselecteerd, zal een redacteur voor publicatie contact met u opnemen. En als uw werkplek werkelijk interessant is – of inspirerend, grappig en/of creatief van opzet – ontvangt u wellicht zelfs een aardigheidje van uw vrienden bij Elektor.
Of u nu een professional bent of een student of een hobbyist – wij zijn geïnteresseerd in uw eigen elektronica-lab of werkplek. Het doet er niet toe of u een superdeluxe lab hebt met peperdure apparatuur, of dat u het moet stellen met een tafel plus soldeerbout in een hoekje van de zolder – we horen graag van u!
Laat ons uw elektronica-lab zien!
Niet alleen zouden we graag foto’s of video’s van uw lab zien, we willen ook graag weten wat u gebruikt, waarmee u meet en waar u aan werkt.- Hoe ziet uw werkplek er uit?
- Aan wat voor projecten werkt u?
- Welke componenten, gereedschappen en meet- en testapparatuur gebruikt u zoal?
- Hoe bergt u uw spullen overzichtelijk op?
- Heeft uw lab iets bijzonders, zoals een geheime ruimte, een speciaal ventilatiesysteem of op maat gebouwde kasten?
Wilt u uw werkplek met ons delen? Bezoek de (Engelstalige) Workspace Submission-pagina, waar u ons foto’s en opmerkingen kunt sturen over die speciale plek waar u uw projecten ontwerpt en systemen programmeert.
De redactie van Elektor beoordeelt de inzendigen en kiest de meest opmerkelijke voor publicatie op onze websites en in onze tijdschriften,zoals Elektor, MagPi (Nederlands en Frans) en Make: (Nederlands). Als uw inzending wordt geselecteerd, zal een redacteur voor publicatie contact met u opnemen. En als uw werkplek werkelijk interessant is – of inspirerend, grappig en/of creatief van opzet – ontvangt u wellicht zelfs een aardigheidje van uw vrienden bij Elektor.
Laat het ons zien!
Gedurende de komende dagen en weken zetten we elektronica-werkplekken op onze sites en in donze tijdschriften in het zonnetje. Maak ons deelgenoot van waar u leert en innoveert. Deel dat met de community!Read full article
Hide full article
Discussie (1 opmerking(en))
Gamma 5 jaar geleden
Bij het invullen van de gegevens op de Engelse website bleek dat er slechts 1 foto per vraag ingevoerd kon worden.
Ik heb er nogal wat energie ingestopt om van de grote hoeveelheid gemaakte projecten foto's en een korte toelichting te maken ........... dat is dus nu niet ingevoerd.
De toelichting op die foto's heb ik daarom de genoemde toelichting hieronder geplaatst :
Explanation of photos Workspace Elektor
Ball-Gun
System for shooting ping pong balls.
Shooting is activated by an infrared remote controller (from TV)
Storage : 15 balls. Microcontroller is the Arduino Pro micro.
CNC
This is a hobby CNC machine with 3 axis, driven by stepper motors.
The CNC program is professional, giving pulses on pins of the parallel port.
I made the interface box to drive the stepper motors.
The microcontroller is the R8C (Renesas) as introduced by Elektor in 2005/2006.
Home Alarm
Detection of “nocturnal visitors” in our backyard; giving flashing lamps and acoustic
signals.
Infinite Mirror
A well-known system built by every hobbyist.
LaserBeam
A system to make nice figures by projecting a simple laser beam via 3 rotating mirrors.
The rotation speed of the 3 motors is PWM controlled by an Arduino Duemilanove .
By playing with 3 potentiometers for speed control I found many “nice figures”, and programmed their speeds in the Arduino. These figures can by preselected with a 16-position selector switch.
This project was described in E(lector) in July/August 2012.
MagTrain
This is to tryout the principle of the magnetic train as used in Japan and Germany.
A ball (from a ball bearing) can go around through a circled tube.
A large coil fixes the ball in a defined starting position and 4 “running coils” push the ball through the tube …… just only for 1 round.
The microcontroller is an Arduino type Pro micro.
This first setup of this project (with Visual Basic) was described in Elector in July/August 2011.
Motor Brushless
This system is to show the principle of this type of motor.
Using stick’s and DVD’s nowadays I used my old turntable for this.
On the rotating plate you see 4 strong magnets. (from actuators in hard drives)
On the non-rotating white plate in the front 6 coils are installed for driving the plate.
On the non-rotating white plate at the backside 6 reed relays have the function of
position feedback.
In order to provide running in both direction this plate (with switches) can be moved
about 20 degrees left/right.
The microcontroller is an Arduino type Pro micro.
Motor HD1
Being enthusiastic about rotating/moving things I used an actuator from a
disassembled hard drive to drive a rotating …… let’s say “steam engine”.
The 8-digit display with 8 switches give possibilities to indicate and control speed
and direction + start/stop.
It runs up to 1800 RPM.
The microcontroller is an Arduino type Pro micro.
This project was described in Elector in April 2010
Motor HD4
After the HD1 motor next version was a 4 cylinder motor in a star construction.
The microcontroller is an Arduino Uno.
Motor-Diesel
Next step is a coil with a moving core.
Honestly this was the first “4 cylinder motor” I built.
It runs via the parallel port and is programmed in Visual Basic.
Overhead Crane
This crane was –as you will see- built in 2006.
It runs under Visual Basic via the parallel port.
It transported X times iron parts from point A to point B using a magnetic coil’.
The wheels for riding have stepper motors.
It operates via the parallel port and is programmed in Visual Basic.
Peeling Apples
A simple system for loading/unloading and peeling Apples.
The microcontroller is an Arduino type Pro micro.
POV (Persistence of vision)
This system is built to fit in a window we have at the street side on the second floor.
The leds rotate in a circle approximately 90 cm in diameter.
We use it for paying special attention to events in our village. (e.g. the yearly Triathlon)
It is provided with 3 times 16 leds.
In rotates at about 15 RPM, which actually a bit too low, but still clearly visible.
Higher speeds should be possible, but it would be too dangerous if you touch it.
To control the 48 leds a microcontroller model R8C is used; it has just enough I/O to
control 16 leds and 3 different colors.
Making the different characters is a lot of work; I use a program in Visual Basic to get the
required numbers for the upper and lower part of the characters.
These numbers are used by the program in the R8C to operate the 16 leds in a row.
SlapClock
A simple system slapping a bearing ball over a sloping rail with a power depending on the
daytime. Along the rail the hours of the daytime are visible.
Every 15 seconds the ball is slapped to the current daytime.
Accuracy?? ……….. your wrist watch is much better !!
Spider
The 6 legs “walk” with 3 servo’s.
It can make all required moves … left/right and forward/backwards.
It operates via the (old) parallel port and is programmed in Visual Basic.
TempBy Telephone
About 12 years ago it was built to help us going out during a long, cold day, not knowing
at which time we would be back home ….. preferable in our heated house.
This system uses the ringtones of the telephone by measuring the sequence of a number
of ringtones.
One hour before going home we dial our own number and after 2 ringtones we hang up.
Then, after 2 to 5 minutes we repeat this procedure for the second time.
If the system sees this time sequence of ringtones it sets the thermostat of the central
heating system to heat up to a preset good temperature.
All other sequences will be ignored ……. up to now nobody hacked this system.
This project is also controlled by a R8C.
WeatherStation
As nearly all electronics hobbyist I built a weather station.
It measures the barometric pressure, the air temperature and the amount of rain.
These data are stored and call be displayed afterwards for the past 8 hours.
An Arduino Uno is the microcontroller I used for this project
XY_Drawing Machine
“Playing” with stepper motors for the 2 arms this construction you get more or less
symmetrical print .
It operates via the parallel port and is programmed in Visual Basic. (many Years ago)
Gerrit van Zeijts
Kolweg 65
7451 AB Holten
The Netherlands
Mail : g.van.zeijts@solcon.nl